Home Sweet Home · inspiration

Sewing Room Organization

Hello November! I can’t believe we are just 2 months away from 2022. I don’t know where the year went, but like always, I start thinking of goals for the new year, and the goals I’ve accomplished this past year. Over the last few years, I’ve become obsessed with organizing! When “Tidying Up” came out on Netflix, I fell in love with Marie Kondo and her methods. I was very inspired by the idea of items “Sparking Joy” and bought her books. I went through the entire process two years ago, and our house has felt clearer, and much easier to maintain since then. I am not a minimalist – and Marie’s methods aren’t about minimalism, but the mental process of “letting things go” has truly been life changing.

After organizing the main living spaces of our home, next was my sewing space – which felt like a whole different challenge, and this year’s focus was on my studio! With sewing, there’s a lot of “stuff”; tools, fabrics, machines, little accessories etc, which can easily take over a space, and it can be hard to keep it clean and organized. I’ve been slowly decluttering, re-arranging and organizing every inch of my sewing room.

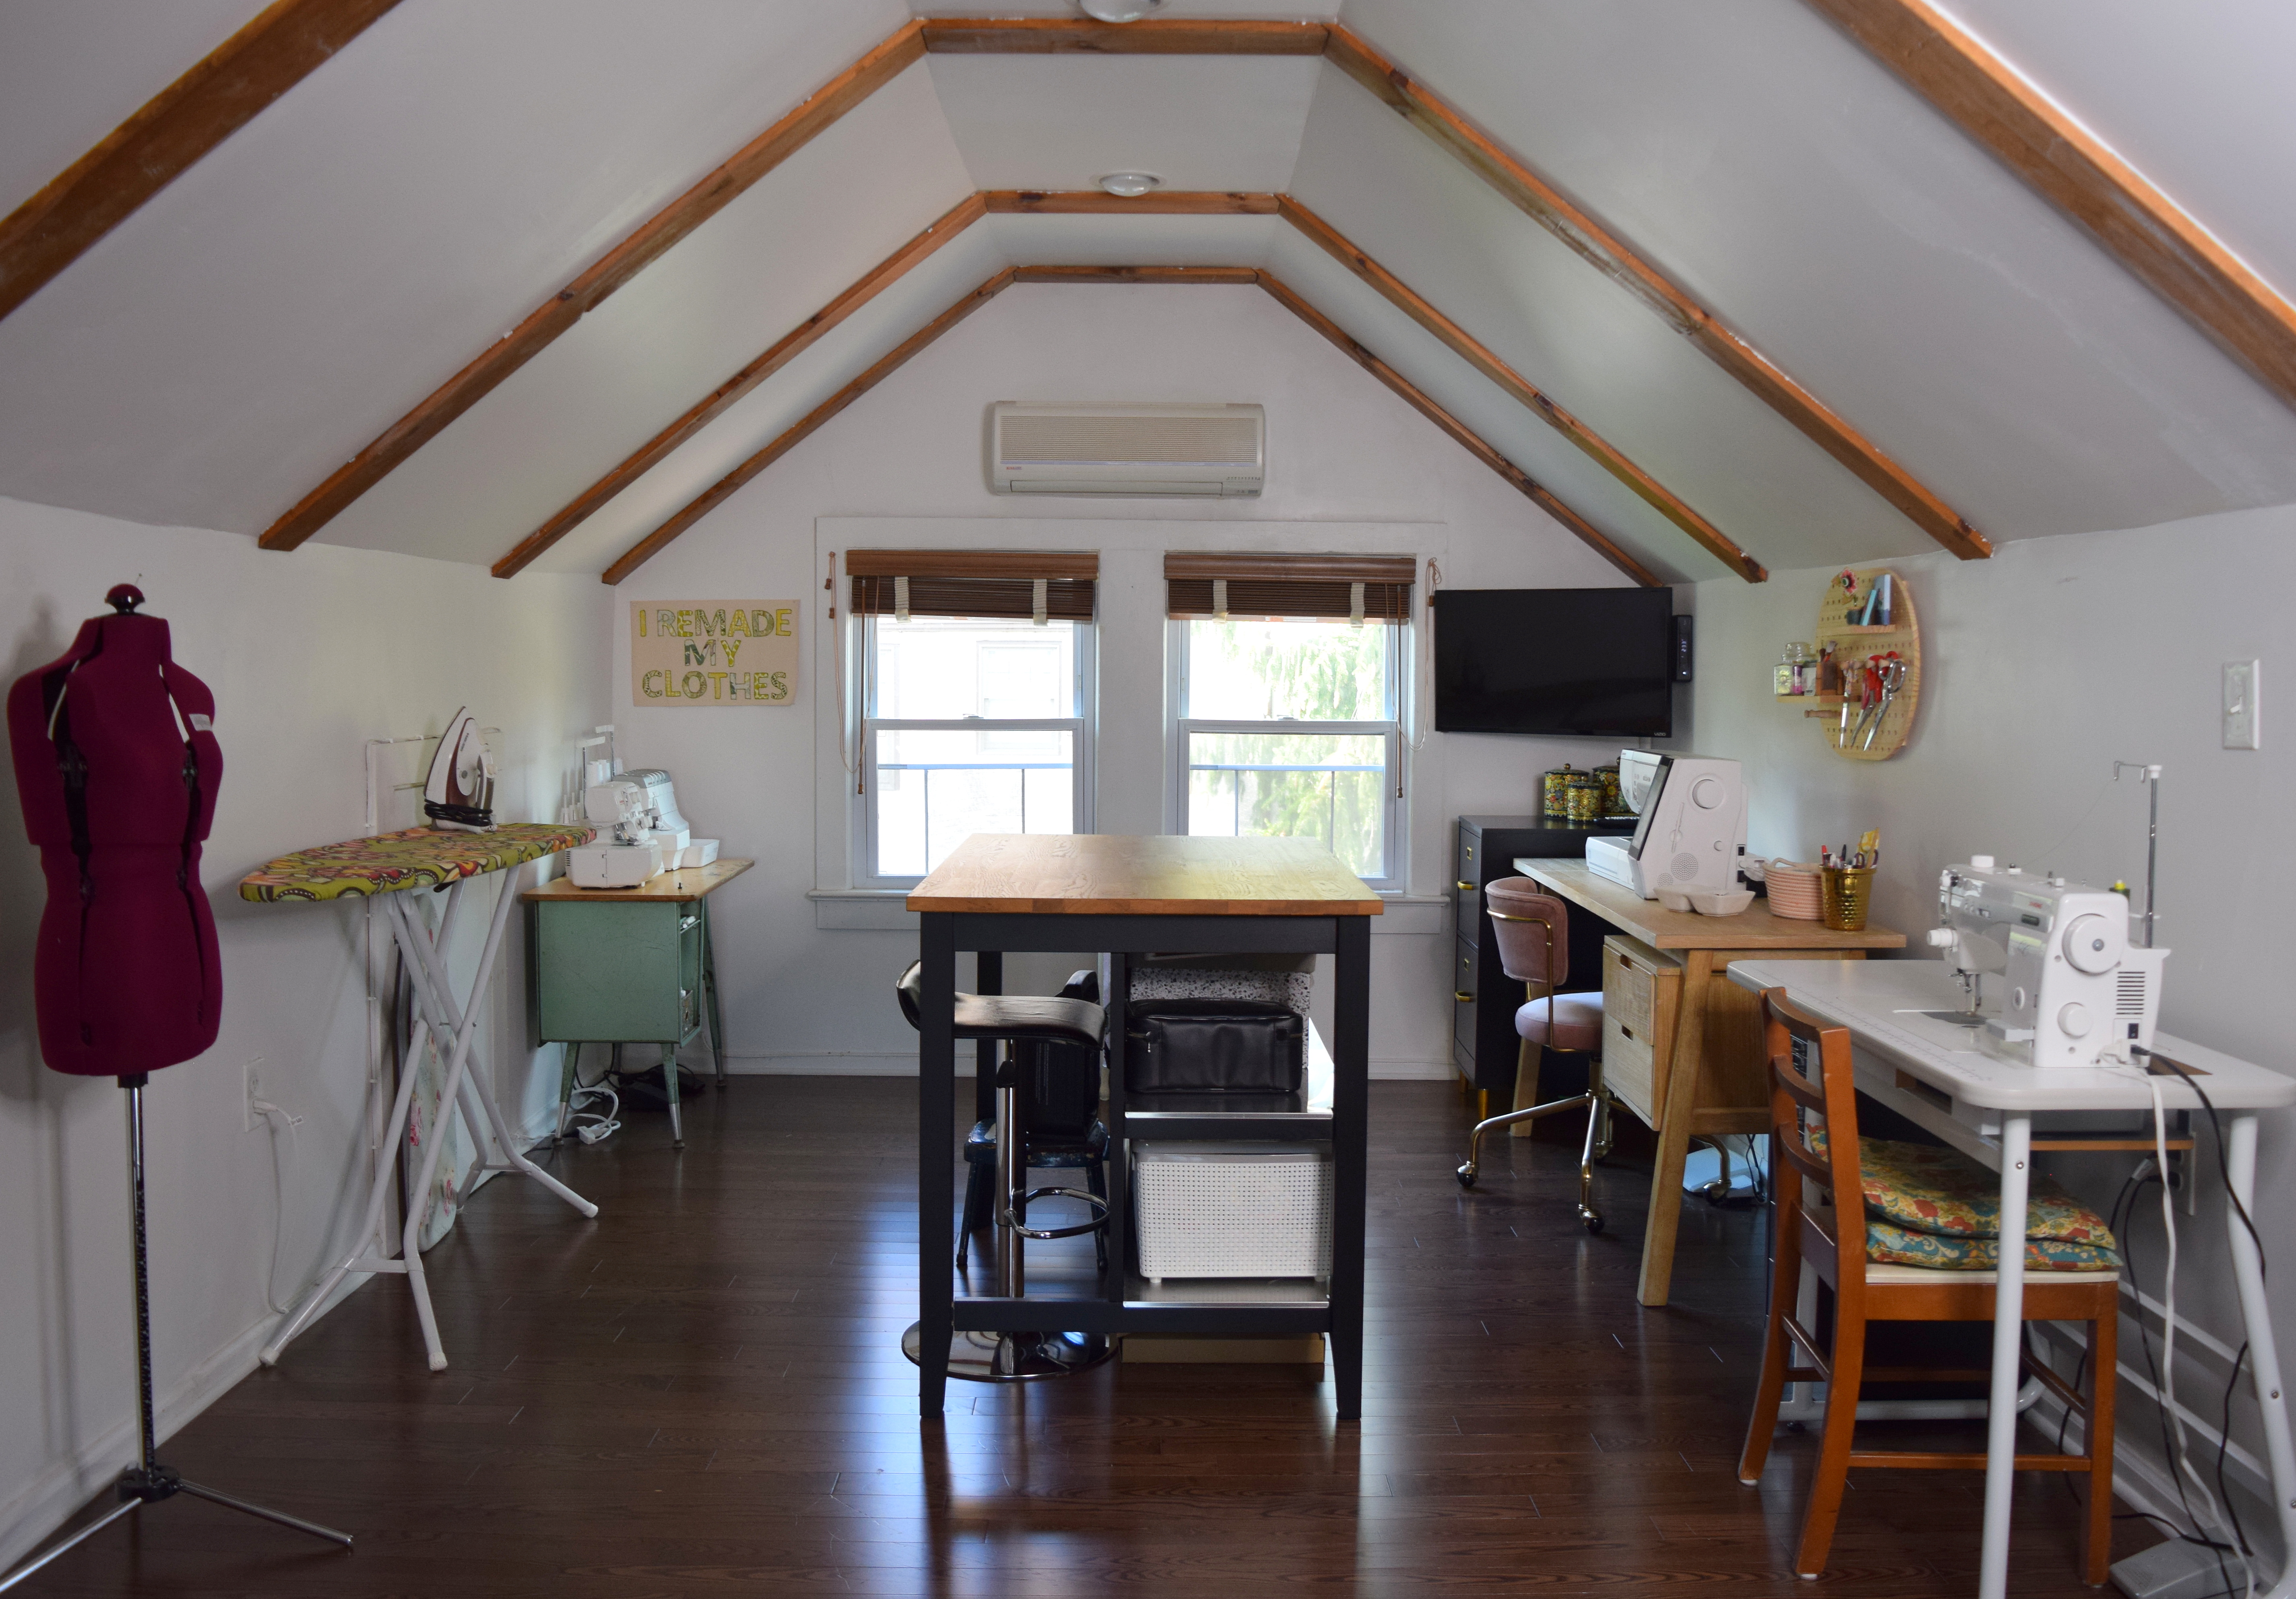
I wanted my studio in the attic so I would be seperate from our living space, but somewhere I would get more light than in a basement studio. We were so fortunate to find our home and I am so, so lucky to have such an amazing space. A few years ago I shared some of the work we had done to the attic, including tearing down a wall, ripping up carpet, putting down wood pre-fab flooring and painting the walls. I’ve added new furniture over the past year to better fit in my space and I feel like I’m in a place where I can show it! After getting organized, I now clean my studio almost every day – I clean up after my day’s work, and I clean during projects. I’ve realized that taking a 5-10 minute break to reset my space clears my mind so much, and I get less frustrated during the sewing process. And starting the day in a clear, inviting space is an incredible feeling!

After 16 years and 4 sewing spaces, I’ve finally found systems that work for me and I wanted to share them! I love looking at other makers work spaces, and getting inspired by how others create – so I hope you find this post inspiring!

My main area consists of three sewing tables, an island, ironing board, and a filing cabinet and drawer cabinet.

My filing cabinet holds documents and my bag patterns on top, and on bottom are my PDF patterns. I also have three beautiful thrifted canisters on top of my cabinet that are currently empty.

How I organize PDF patterns:

I use flat bottom file folders, and label each a different garment type; tops, bottoms, dresses, outerwear, etc. Within each folder is a clear document holder with the PDF pattern and instruction sheet. To make it a bit easier, each clear folder has the pattern written on the side. I bought a box of these sheet protectors back in college and have been re-using them since!

My sewing desk is from World Market (sold out, but they have other great styles!) and I really love the length and minimal drawers. I don’t like having a lot of drawer space in desks because that allows me to just throw stuff in there and not keep it clean. My drawers hold my thread and bobbins on top, pattern weights and wax paper (to copy patterns), and larger tools on bottom. The top of my desk has a small basket for scraps of projects I’m currently working on, and pencil cup with extra scissors, pliers, and marking tools (pens/pencils). I also keep a small “recycling bin” for old needles.

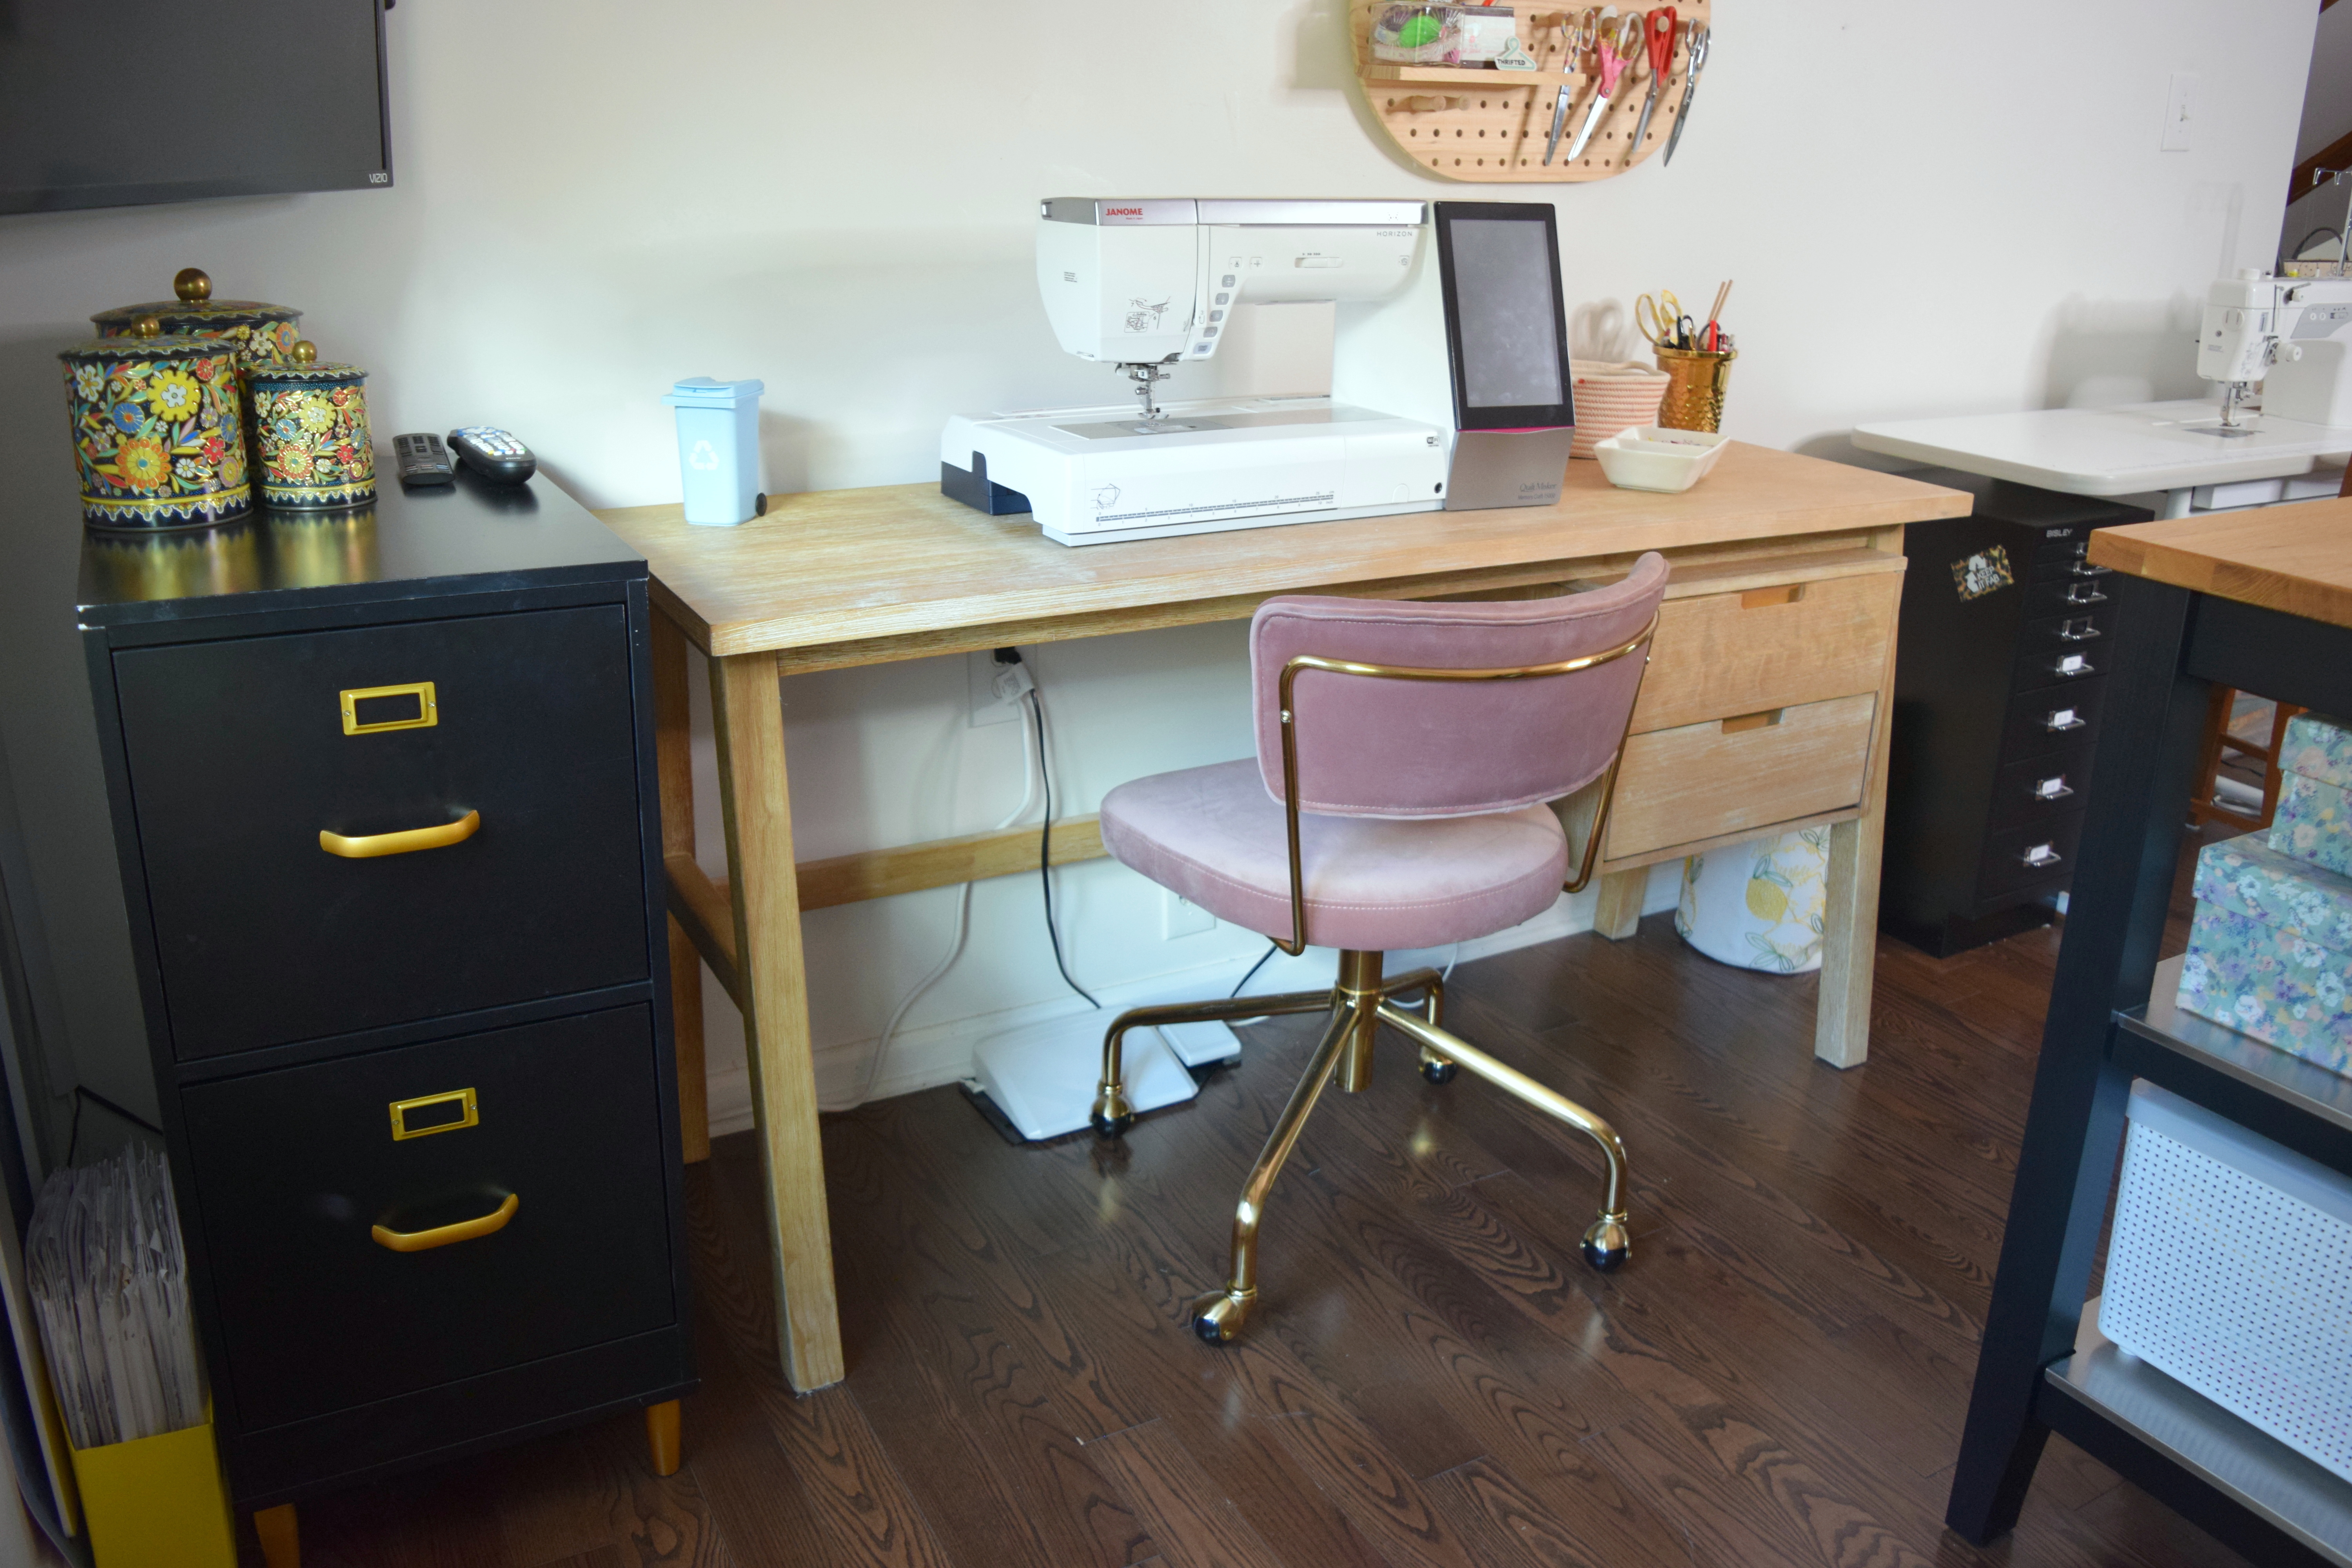
Above my desk is my ‘everyday tools’ organization. I love peg boards, but didn’t need something really big. This small organizer is perfect. It holds my scissors, seam rippers, snips and tape measures. I also decorate it with artwork and trinkets that I really love.

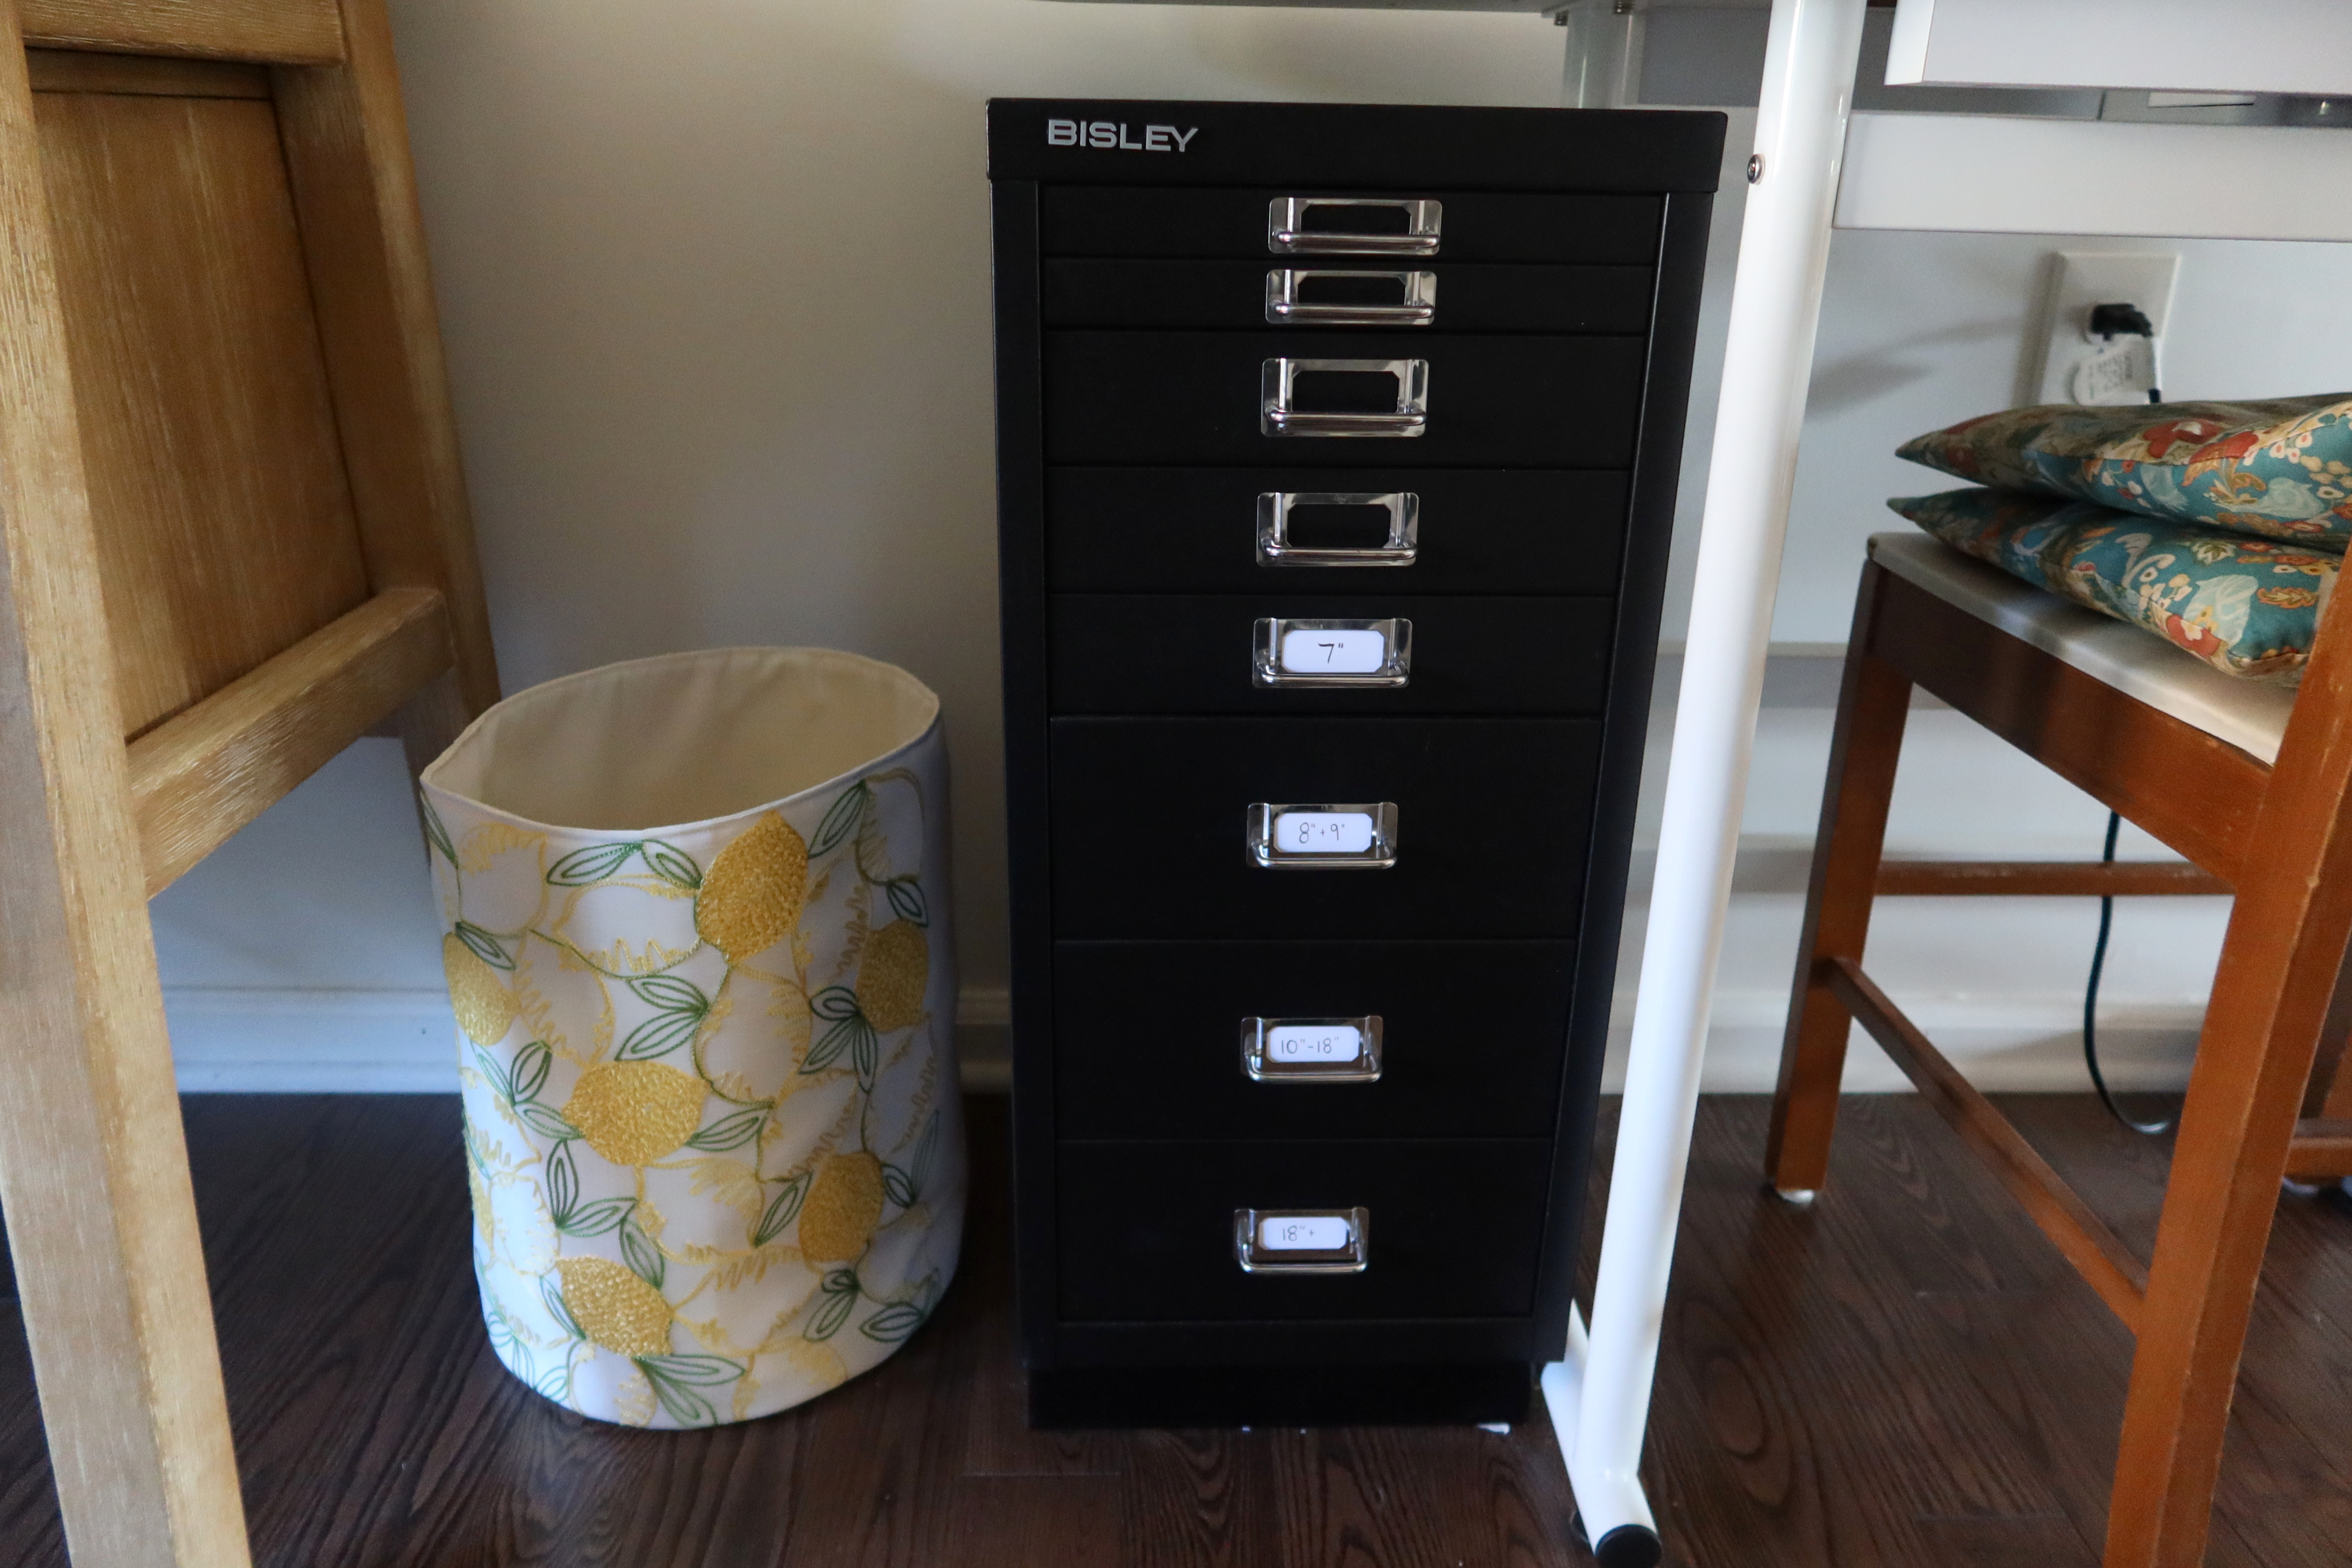
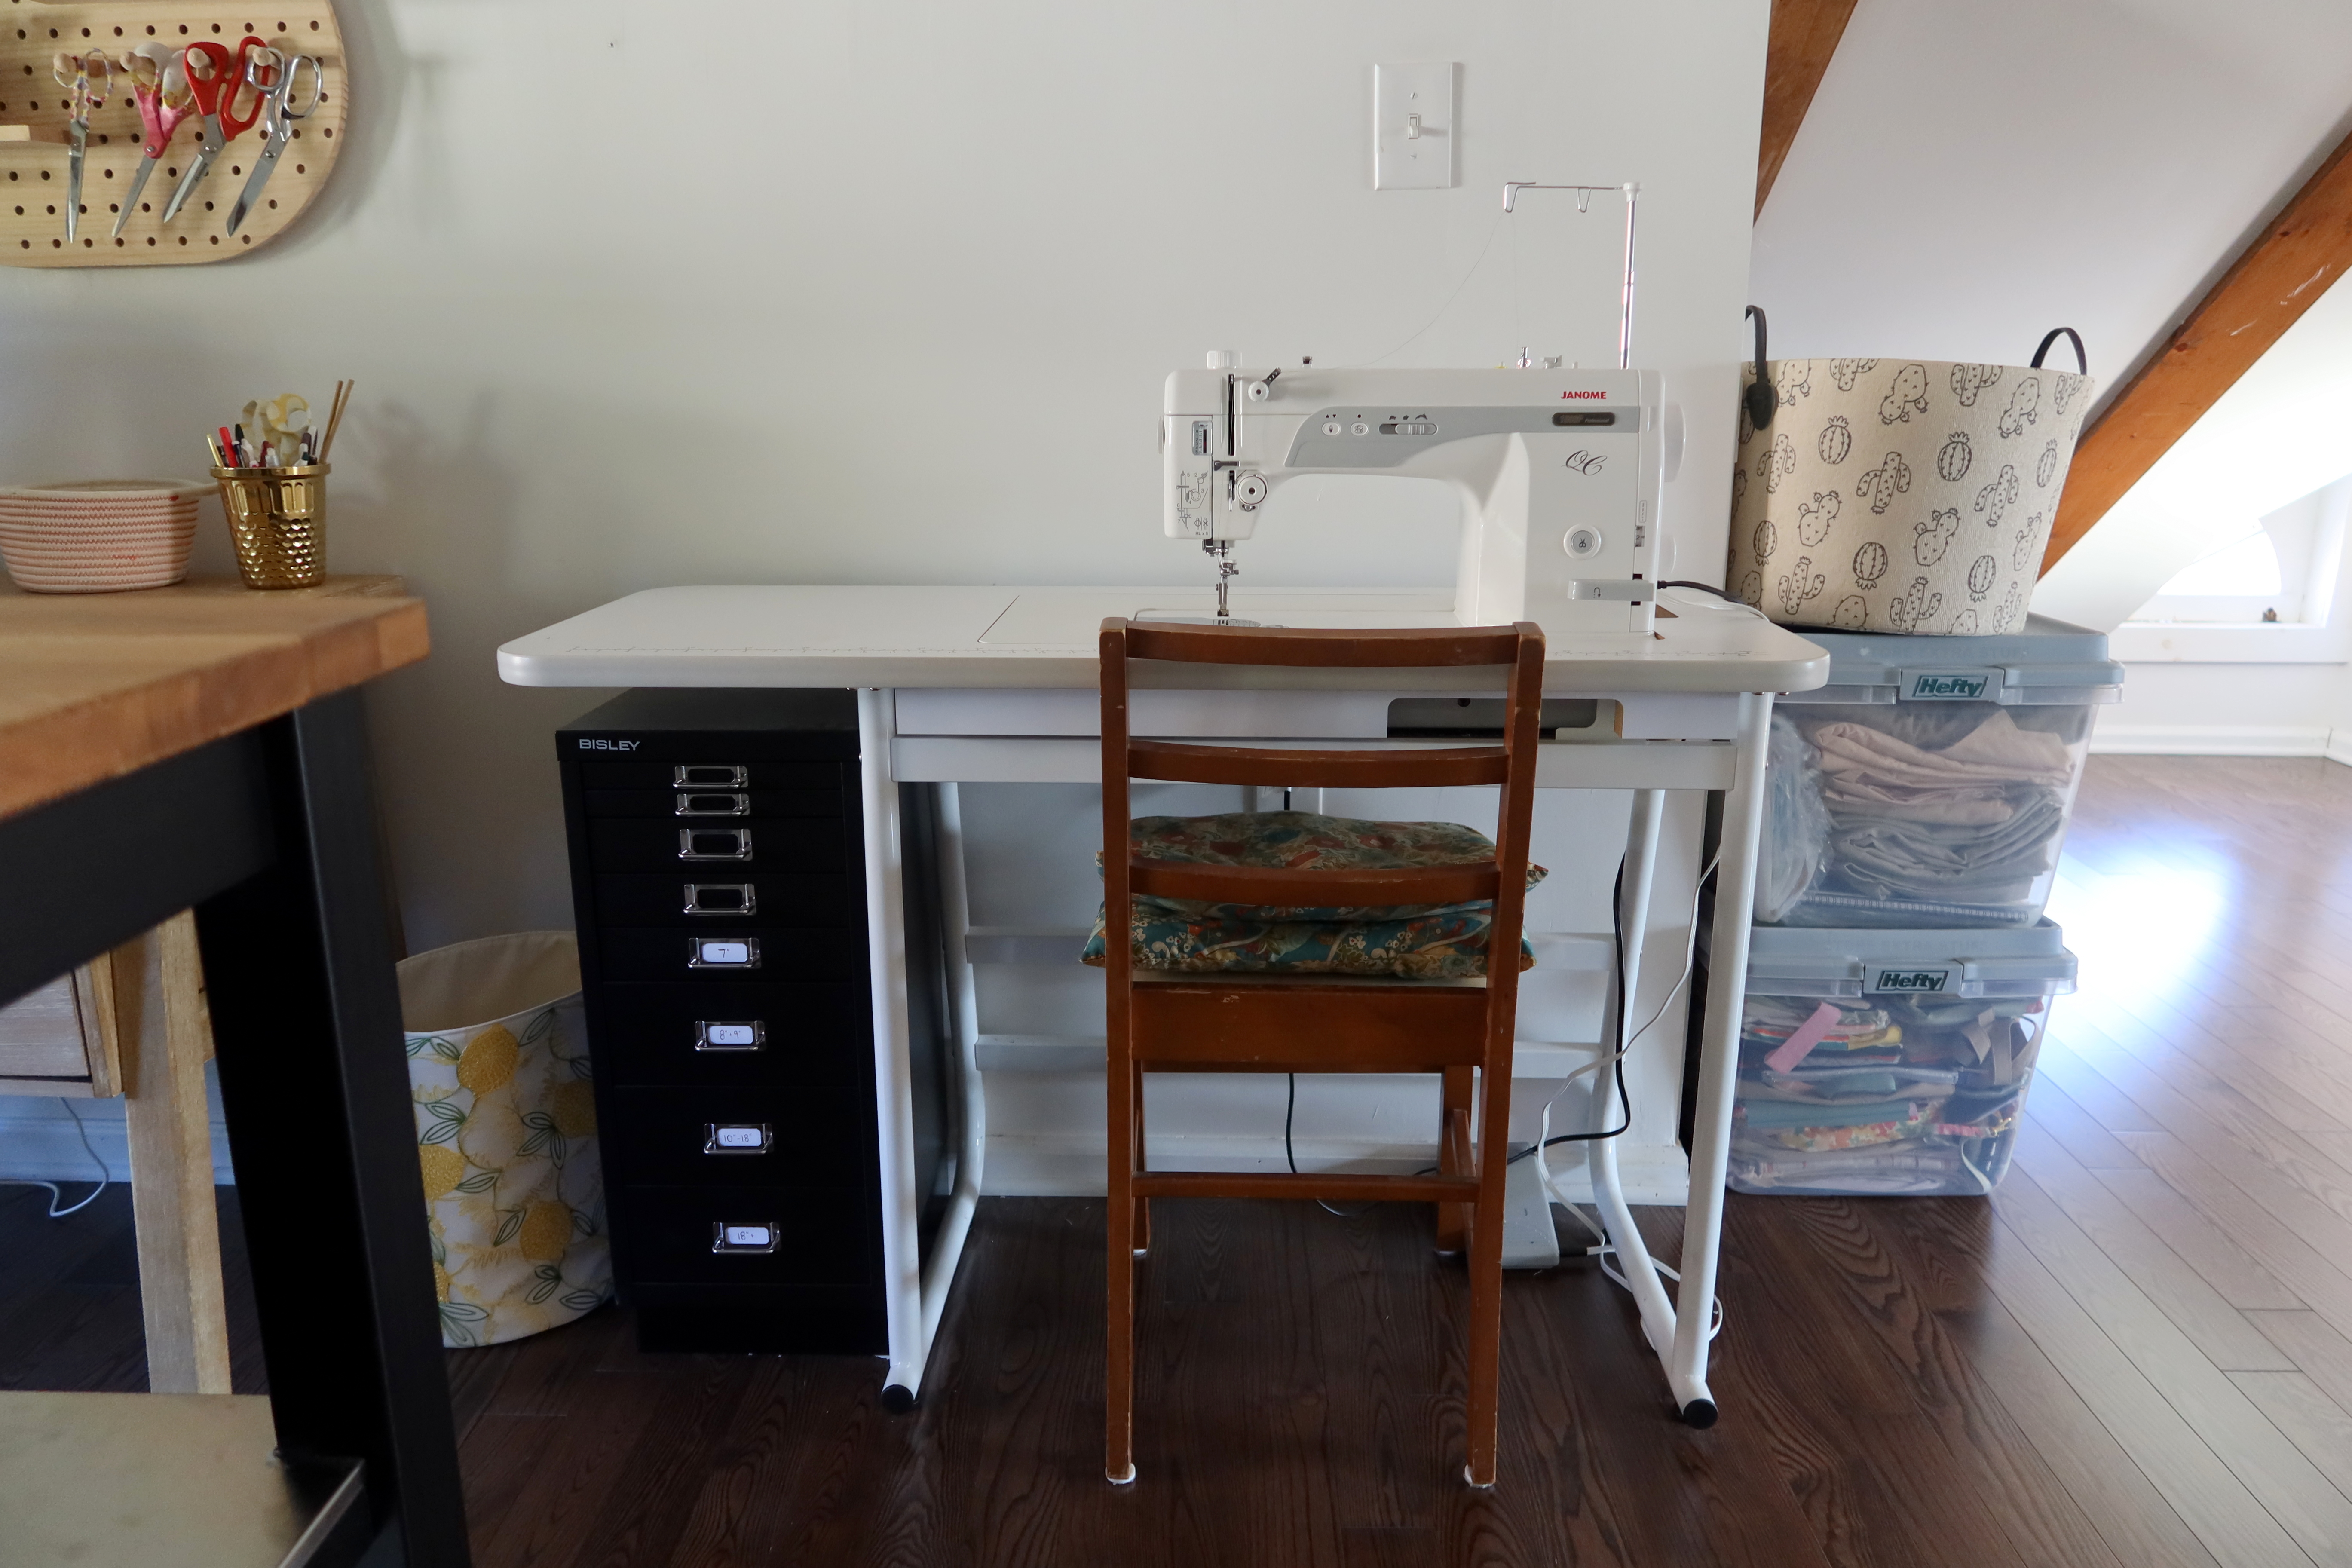
Next to my desk is a little garbage bin I made from a table runner (I hope to share this in a future post!), and my Bisley zipper cabinet. This was definitely an investment piece but I had been struggling so hard with organizing my zippers, this piece was perfect! I organize my zippers by size, which is much better than the shipping box I used to store them all together in. My zipper storage sits perfectly under my industrial machine table, which is it’s own desk.

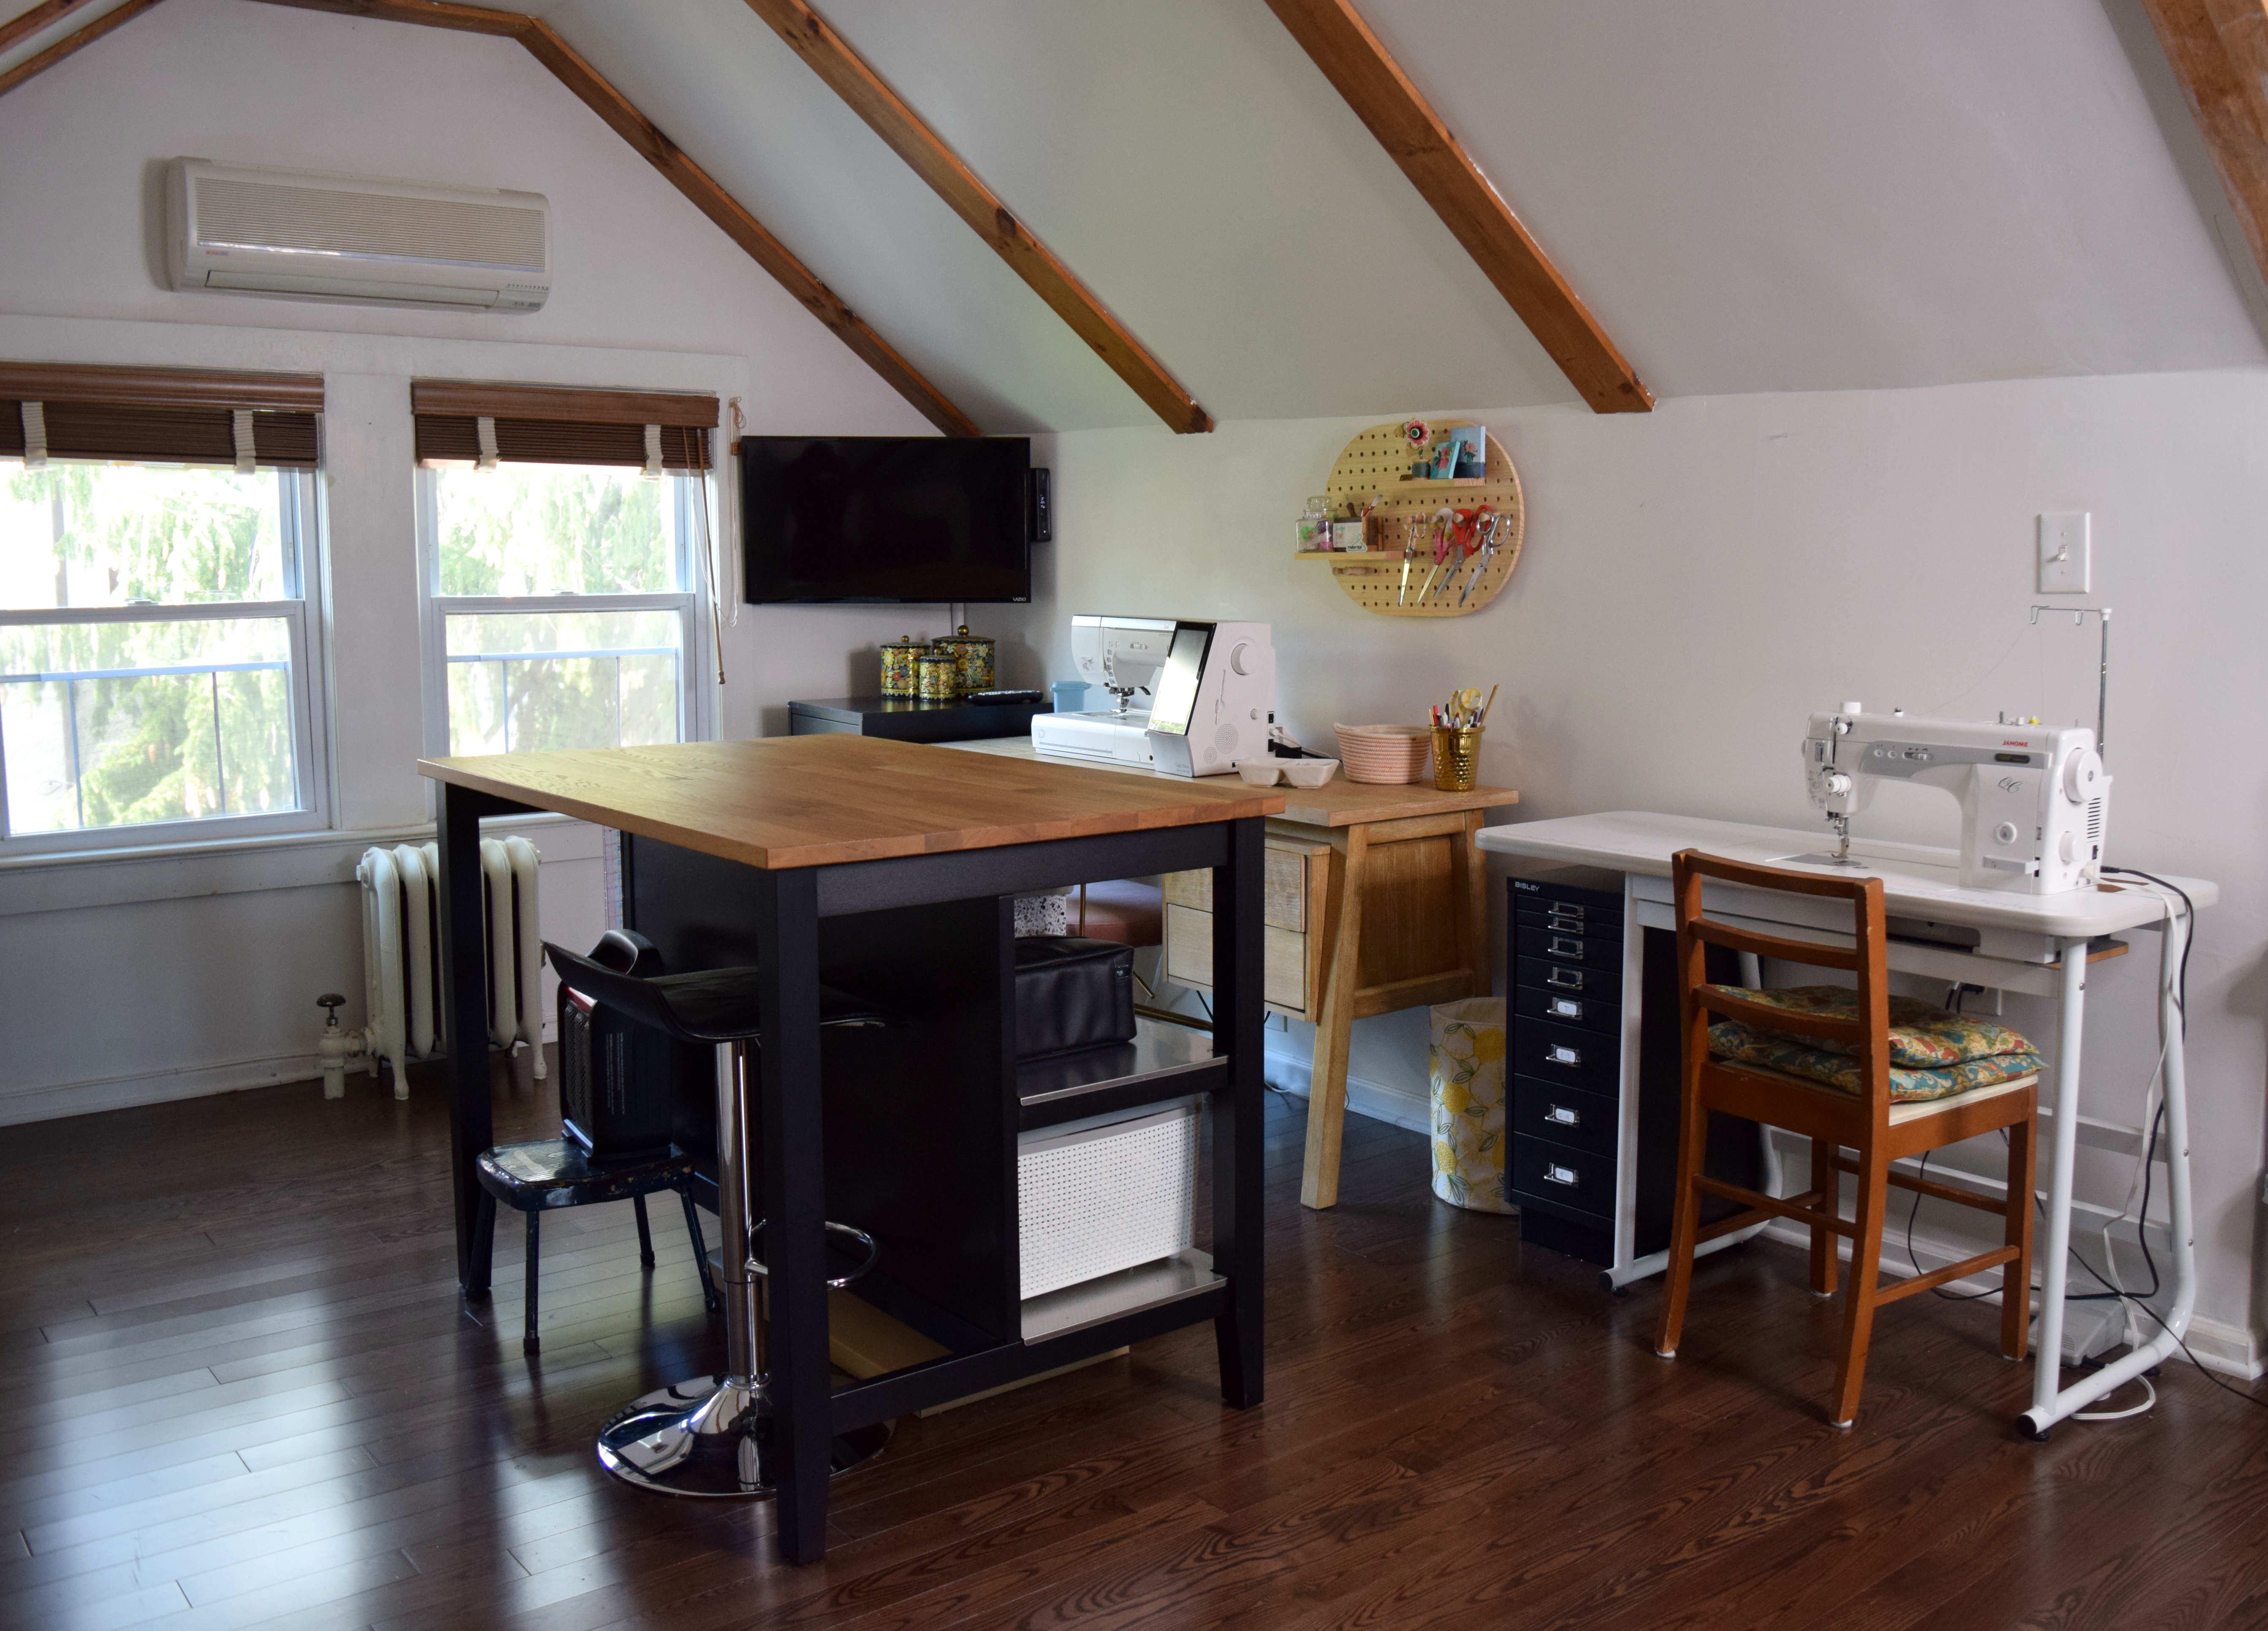
In the middle of my sewing space is my island – which is a kitchen island from Ikea. I am so in love with my island, and getting to sit at it every day is such a treasure. I bought the Stenstorp, which is no longer available but a similar island is the Vadholma. There are so many sewing tables on the market, but many of them have drawers, cabinets, etc, and I wanted something more open. The back side is where I store my chair, stepstool and heater (the attic does get chilly!). The front shelves hold four fabric bins on bottom (mainly fabric for bags), and the top holds more tools, elastics and trim, embroidery threads, sewing machine accessories, and a bin of fabrics leftover from refashioning projects.

The top bins were my Mom’s, who cleaned out her closet and passed them along to me!

Under the island I store the embroidery machine hoops. Not an ideal spot but my embroidery machine and hoops are on loan from Janome so I don’t need permanent storage, but it needs to be accessible.

One of the more recent additions to my space was this little hook for my rulers! I’ve had a battle with storing my long rulers and was never happy with where I put them. I got a little hook at the Container Store and attached it to my island. The littlest things make me the happiest!

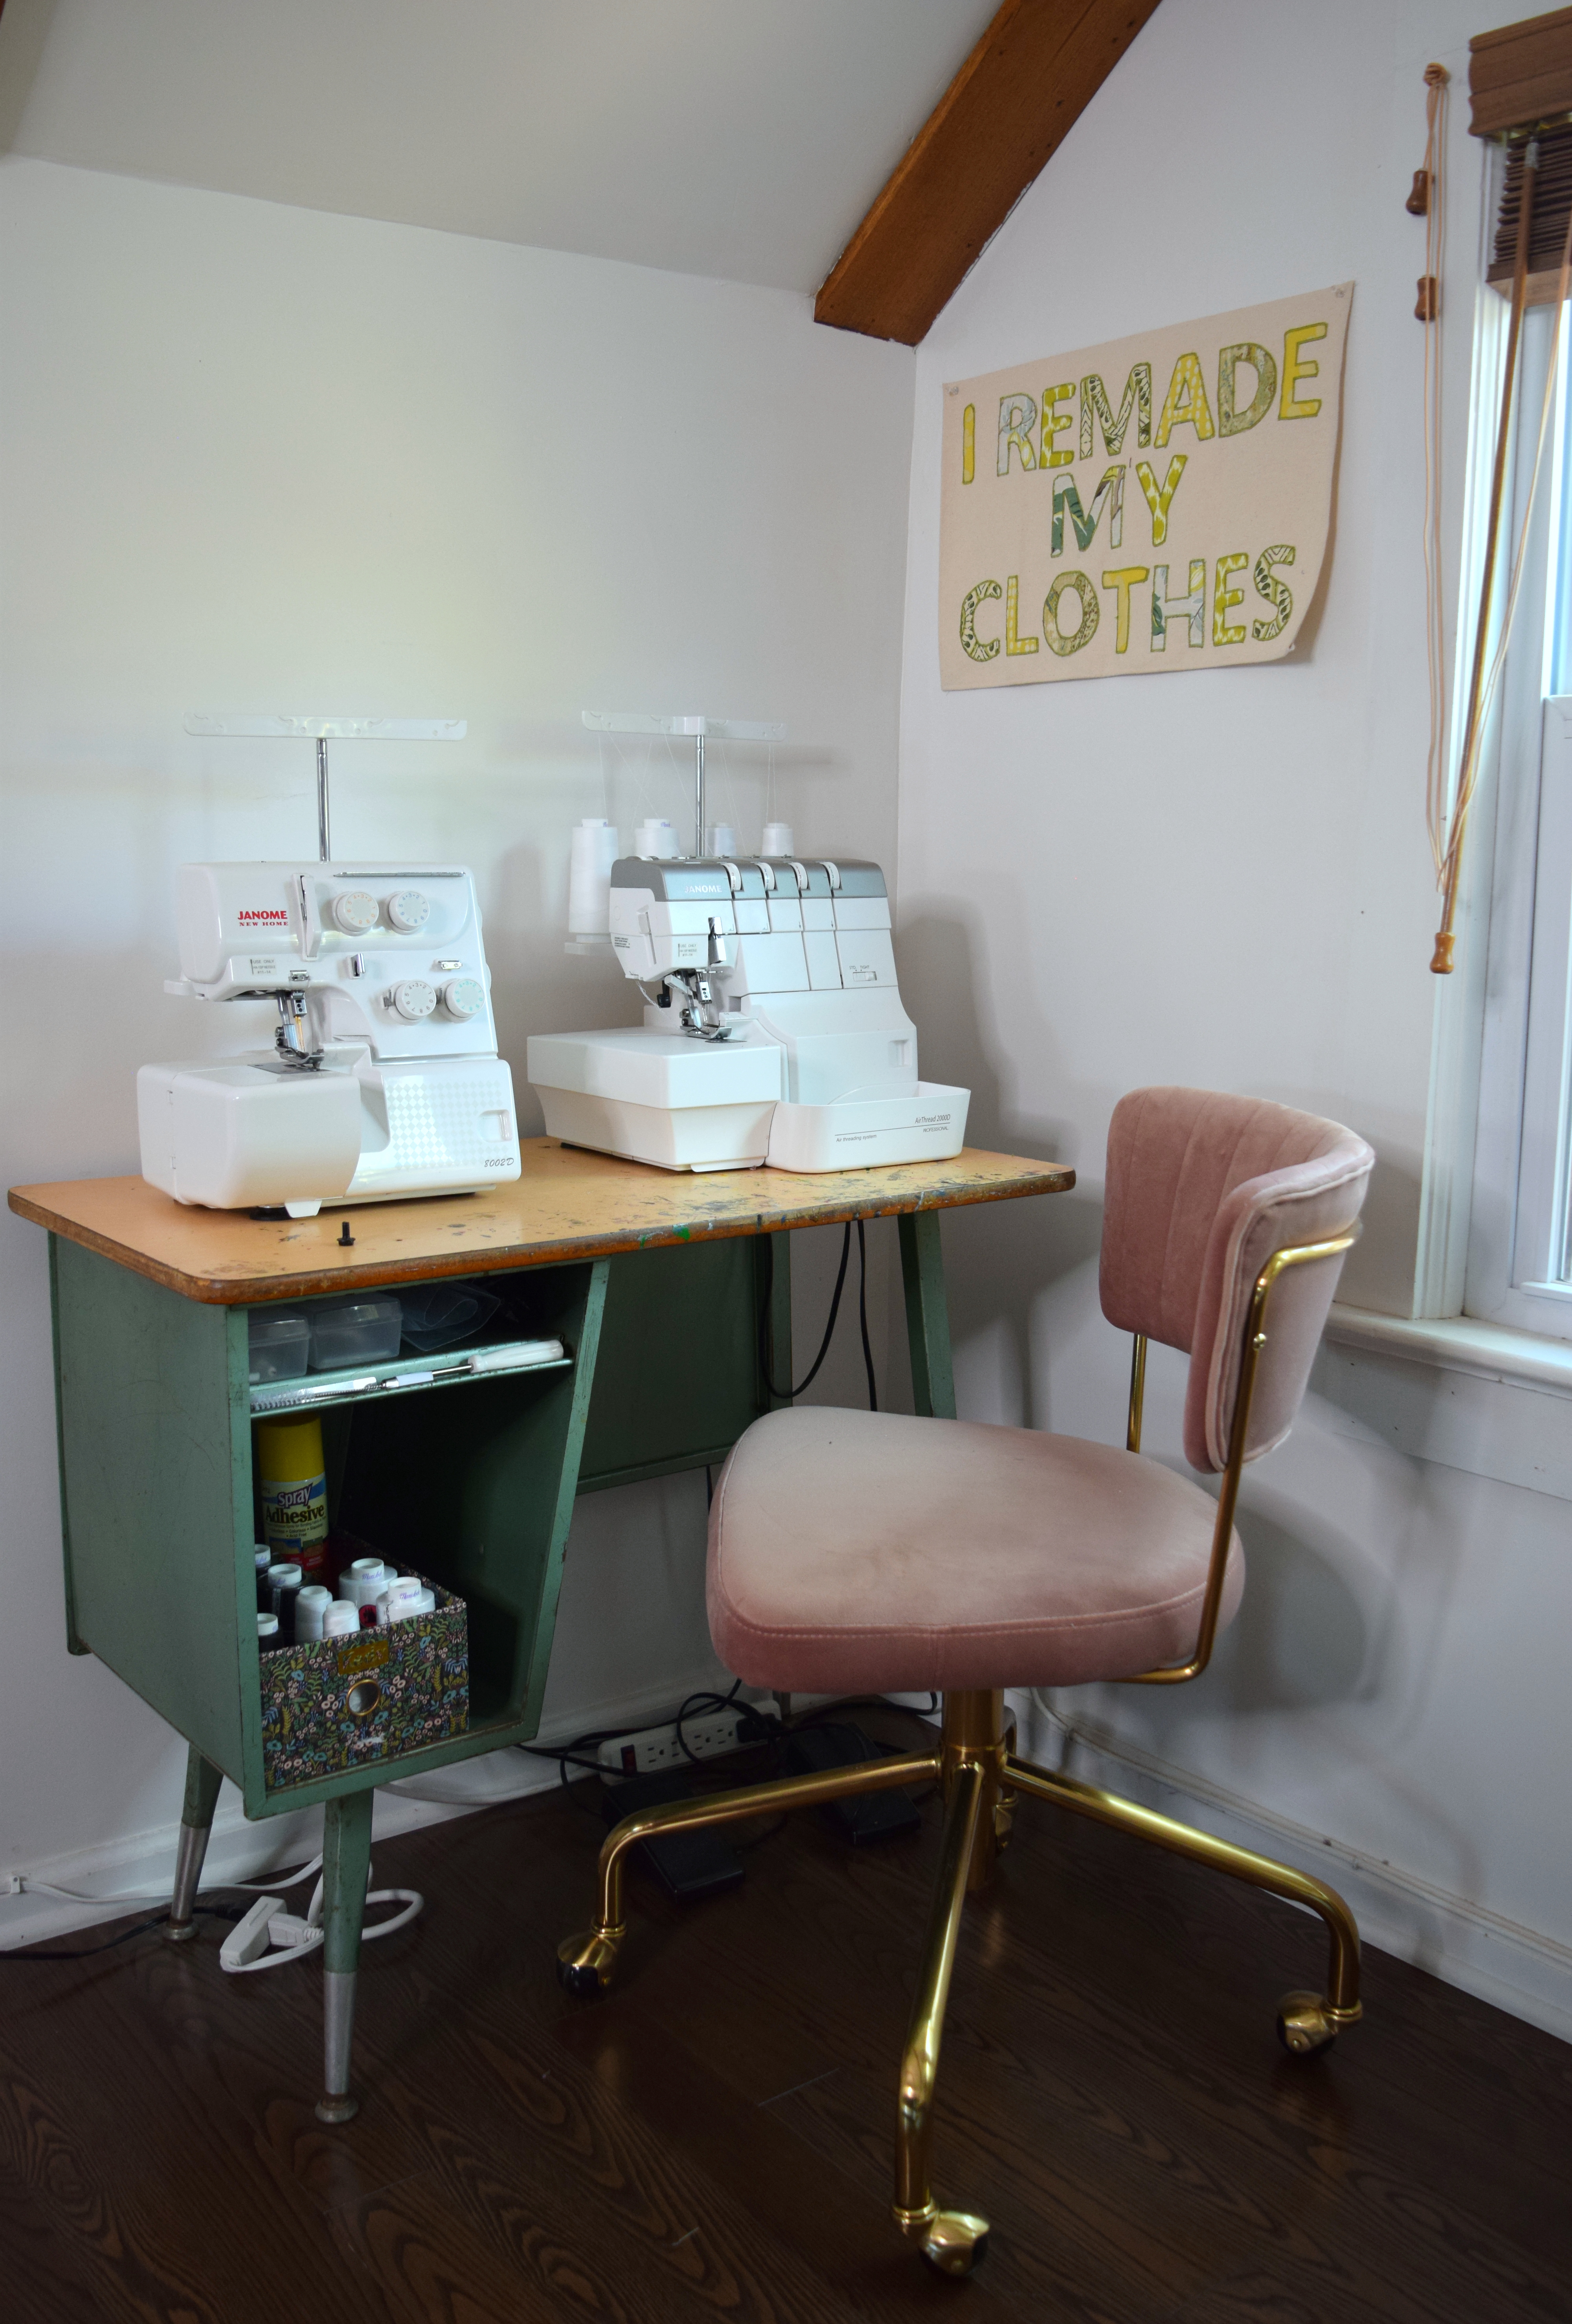
On the other side of my sewing area is my serger desk and ironing board. I’ve had three different desks in this area but this one is my favorite! This was in a discard pile from a family members storage area, and I scooped it up without a real purpose, but I fell in love with it instantly. A few months ago I added it to my studio and it feels like the perfect fit. It also stores my serger thread (in a KEDS Rifle Paper Co shoebox!) and machine tools. Also, I only have one pink chair – I just moved it around for photos! (I’m on the lookout for a metal stool to go with this desk, but my other chairs work great for now) I stitch with two sergers, one is mine and one is on loan from Janome. Usually I have one with black thread, and one with white but I took off the black thread while cleaning the machine and haven’t re-threaded yet!

My ironing board stays up 24/7, and I have a mini tabletop one that I put on my island for smaller projects. My dress form also hangs out over here.

On the other side of the room is more fabric storage, my ”office” and bag storage. This side of our attic has vaulted ceilings, so finding storage to fit within the space has been difficult. I’ve re-arranged this side so many times in the past three years because nothing felt right. I finally feel in a great place with each area of this side, and it’s nice that each space has its purpose.

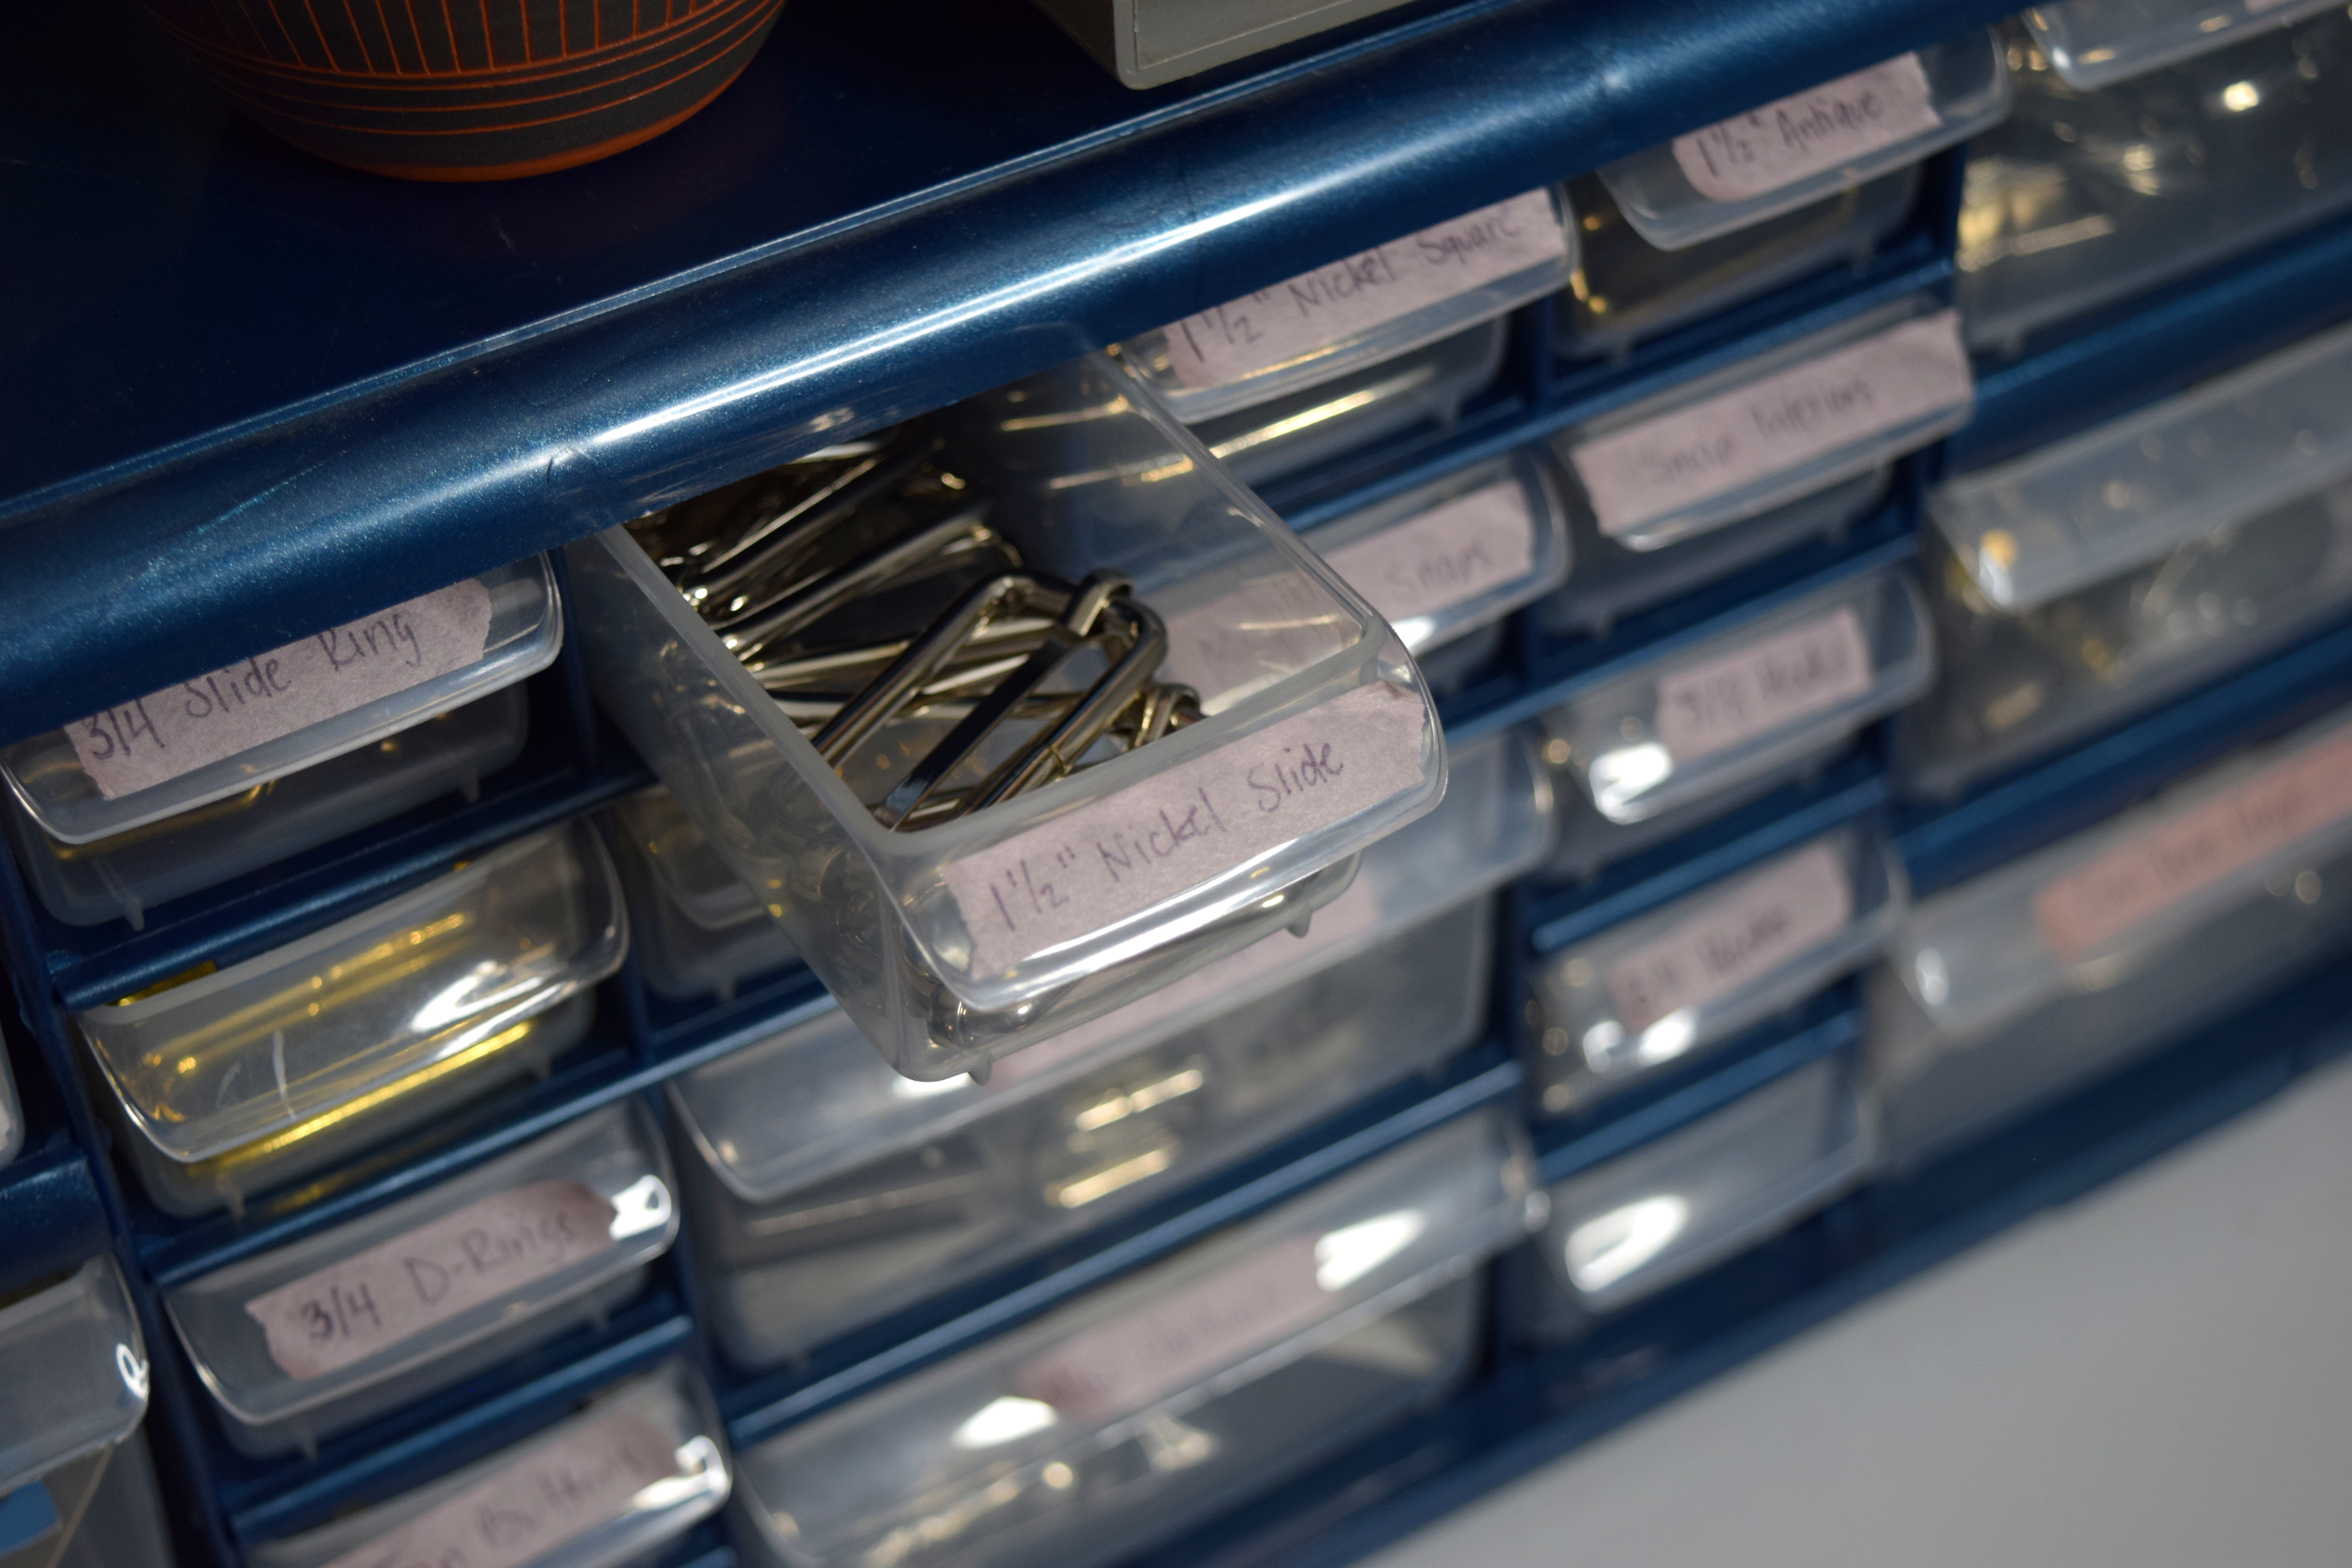
This little unit holds books, sewing patterns, fabric, and all my bag hardware. The larger bin on top holds my hardware, categorized by size. My smaller bin holds any other small things – lead for my sewing pencils, sewing machine tools, etc. My apparel fabrics are in fabric bins, and my collection of sewing books sit next to commercial sewing patterns in their envelopes. This space is also home to my interfacing.

Next to this unit is my rolling cart with current projects. This has helped me keep track of what I’m working on, without just piling it in an empty space. This is also where I store “ideas”, pieces that I want to work on but aren’t ready to start yet. We bought this cart for vegetables/general kitchen storage in our Hoboken apartment, so it’s nice to have a good use for it here.

Up next is my home office! I used to use my tablet on my island but didn’t have a space for it to stay set up until now! I got this desk in high school and now use it as a computer desk where I keep my tablet and a larger second monitor. This desk only has a small drawer that holds post-its, and tape (and my keyboards when not in use), so I use another rolling cart for other items. And yes, my desk chair has flamingos on it!

On this cart I keep my camera and camera accessories, and planning tools like markers and notebooks. The top of my cart has a lid where I can keep my tea/coffee cups and any meals I wind up eating while working. The side of my desk stores my tripod and ring light.

In the next section of my space, I have two storage bins: one of batting, interfacing, and linings, and the other with bag prototypes. The top storage basket holds muslin and sheets to be used for toiles. Behind that, I keep years worth of fabric scraps, which includes toiles from apparel projects, and the smallest scraps and threads. I want to make a few floor poofs, which I will fill with scraps one day, but I haven’t made them yet! (There’s also a small pile of secondhand fabrics that need to be organized)

The final side of my studio is my bag storage/shipping supplies! One of my most recent additions is this beautiful bamboo rack. This is where I keep my bags and accessories, and I use bag hangers from the Container Store, and plastic bins from there as well. I hang up backpacks, tote bags and crossbody bags, and store zip pouches and key fobs. Behind the rack, and on the side of the rack are larger shipping boxes. Bag storage has been another battle for years, and I really didn’t like them in tote storage because they would get squished, and it was hard for me to manage several totes in this space without feeling overwhelmed. I’m looking into garment bags for my bags to hang in, but I do love seeing my hard work all lined up. The two drawer unit is for sale items and pieces that still need to be photographed.

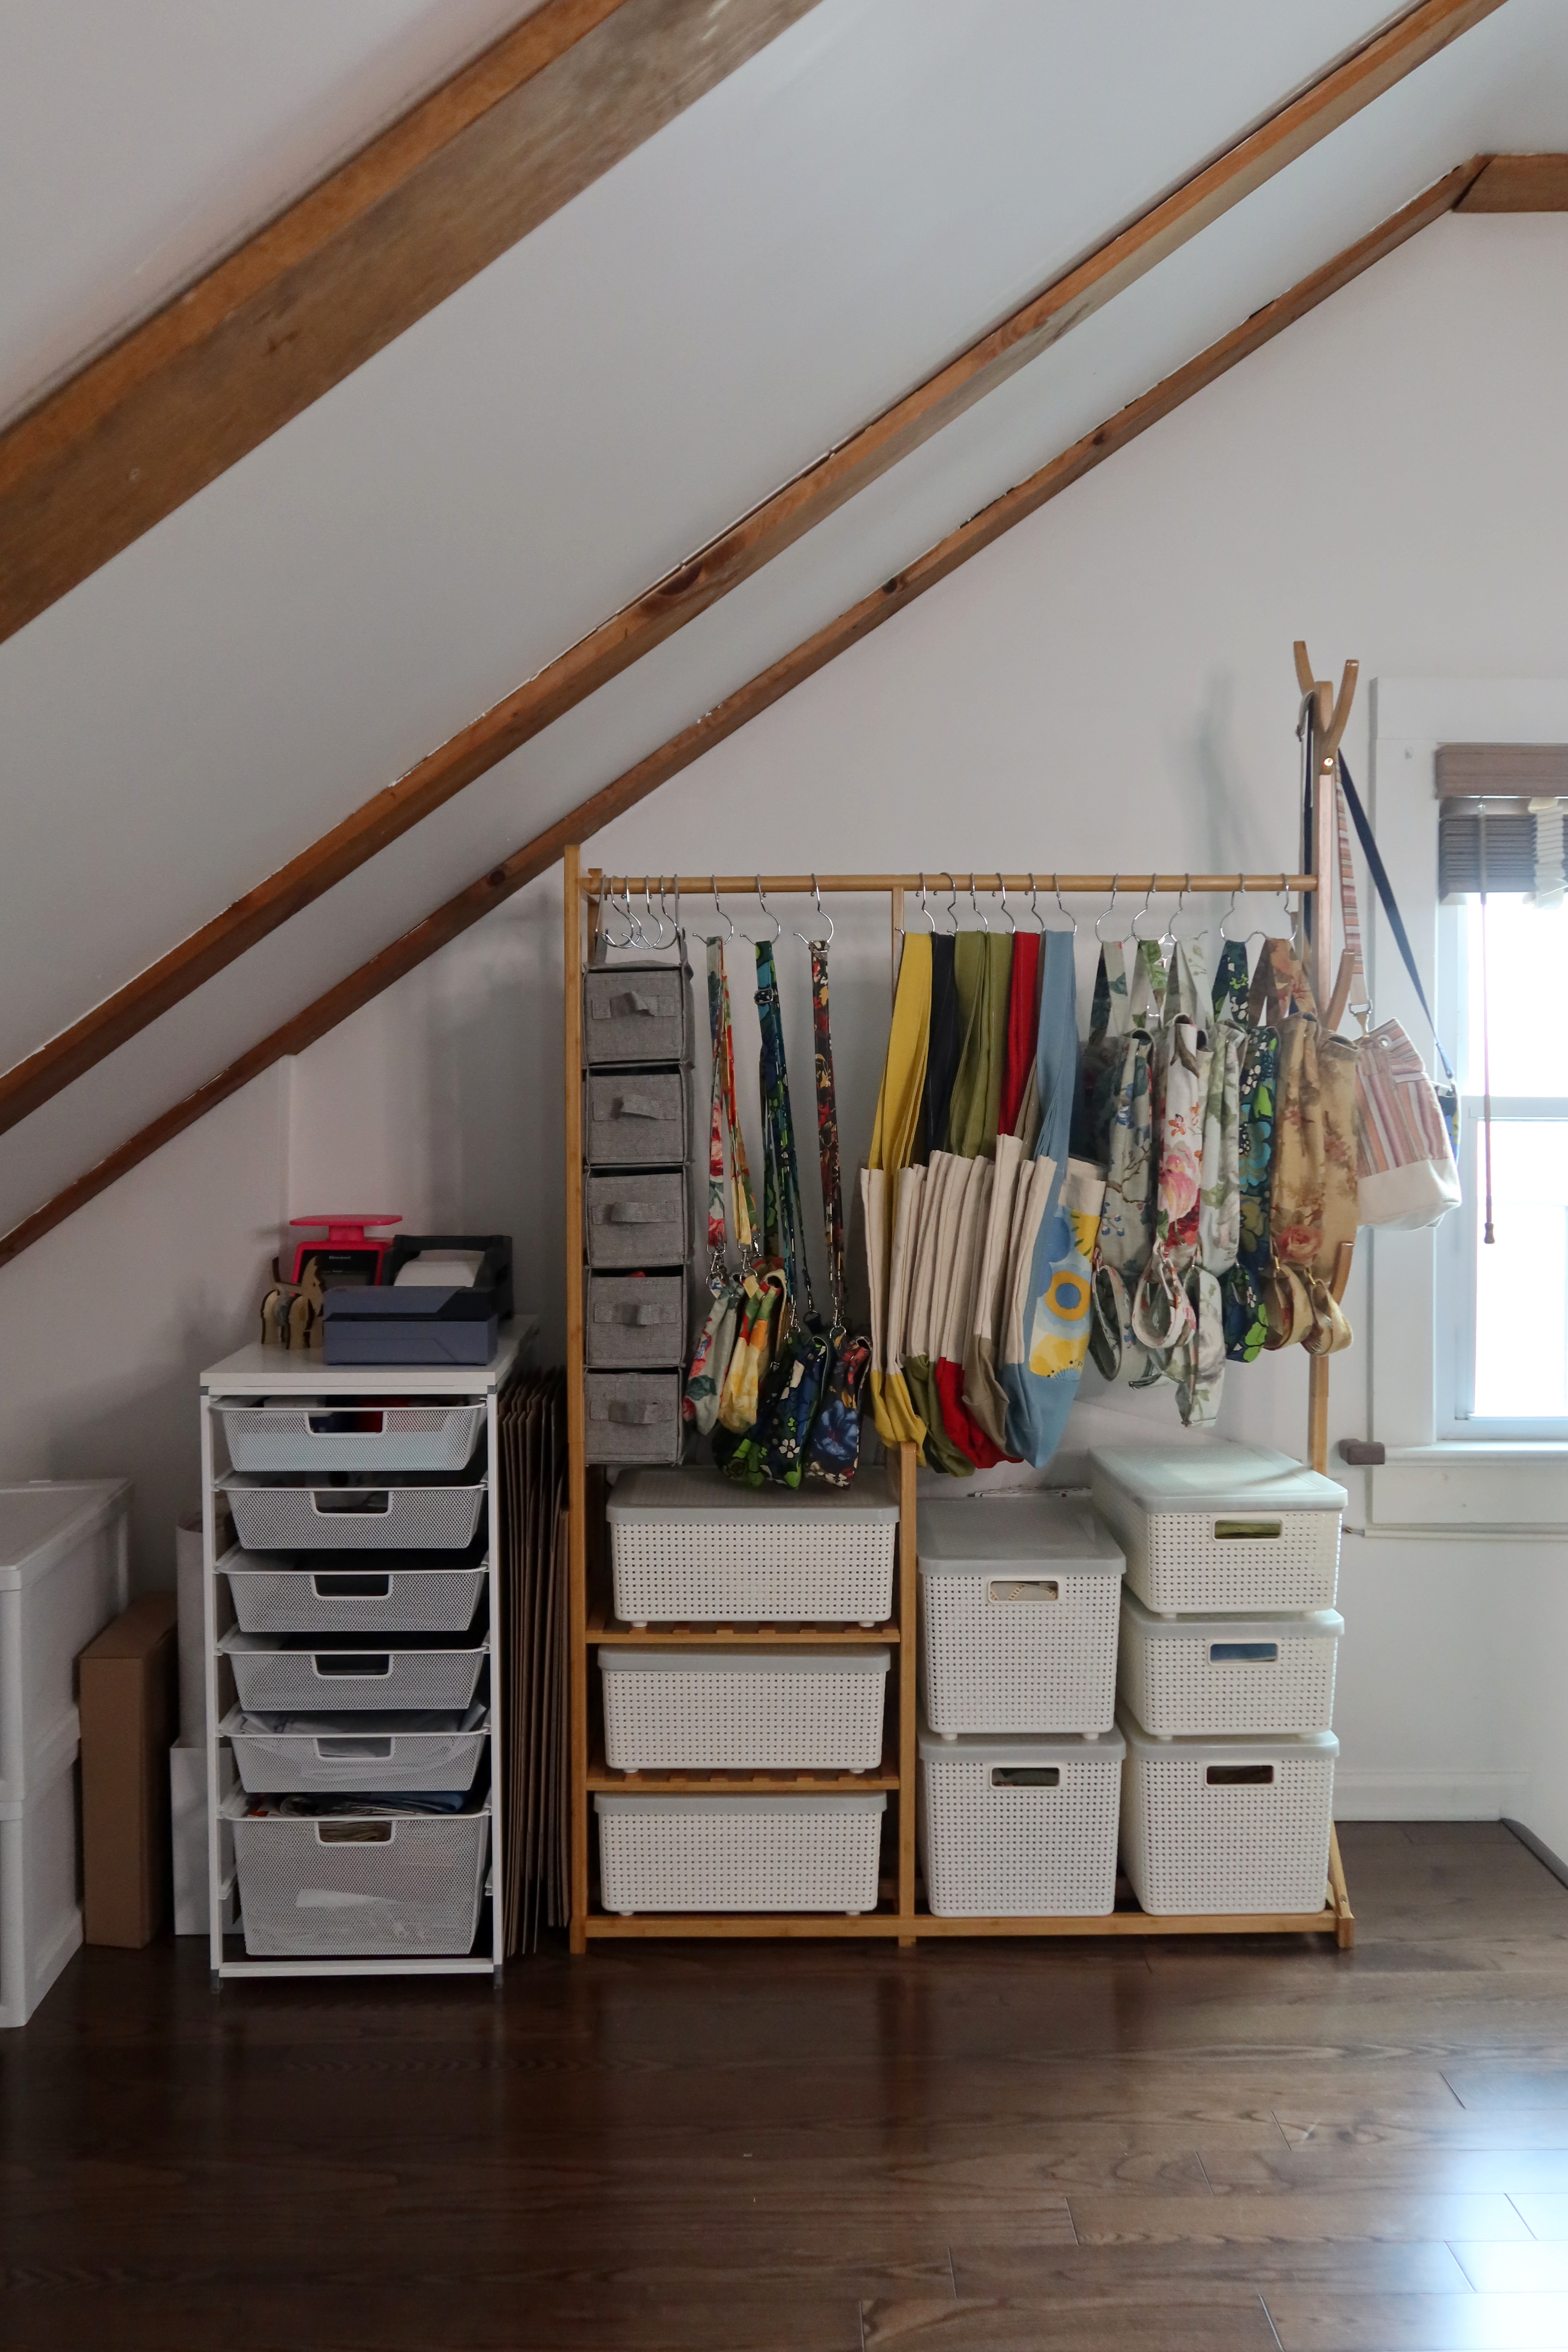
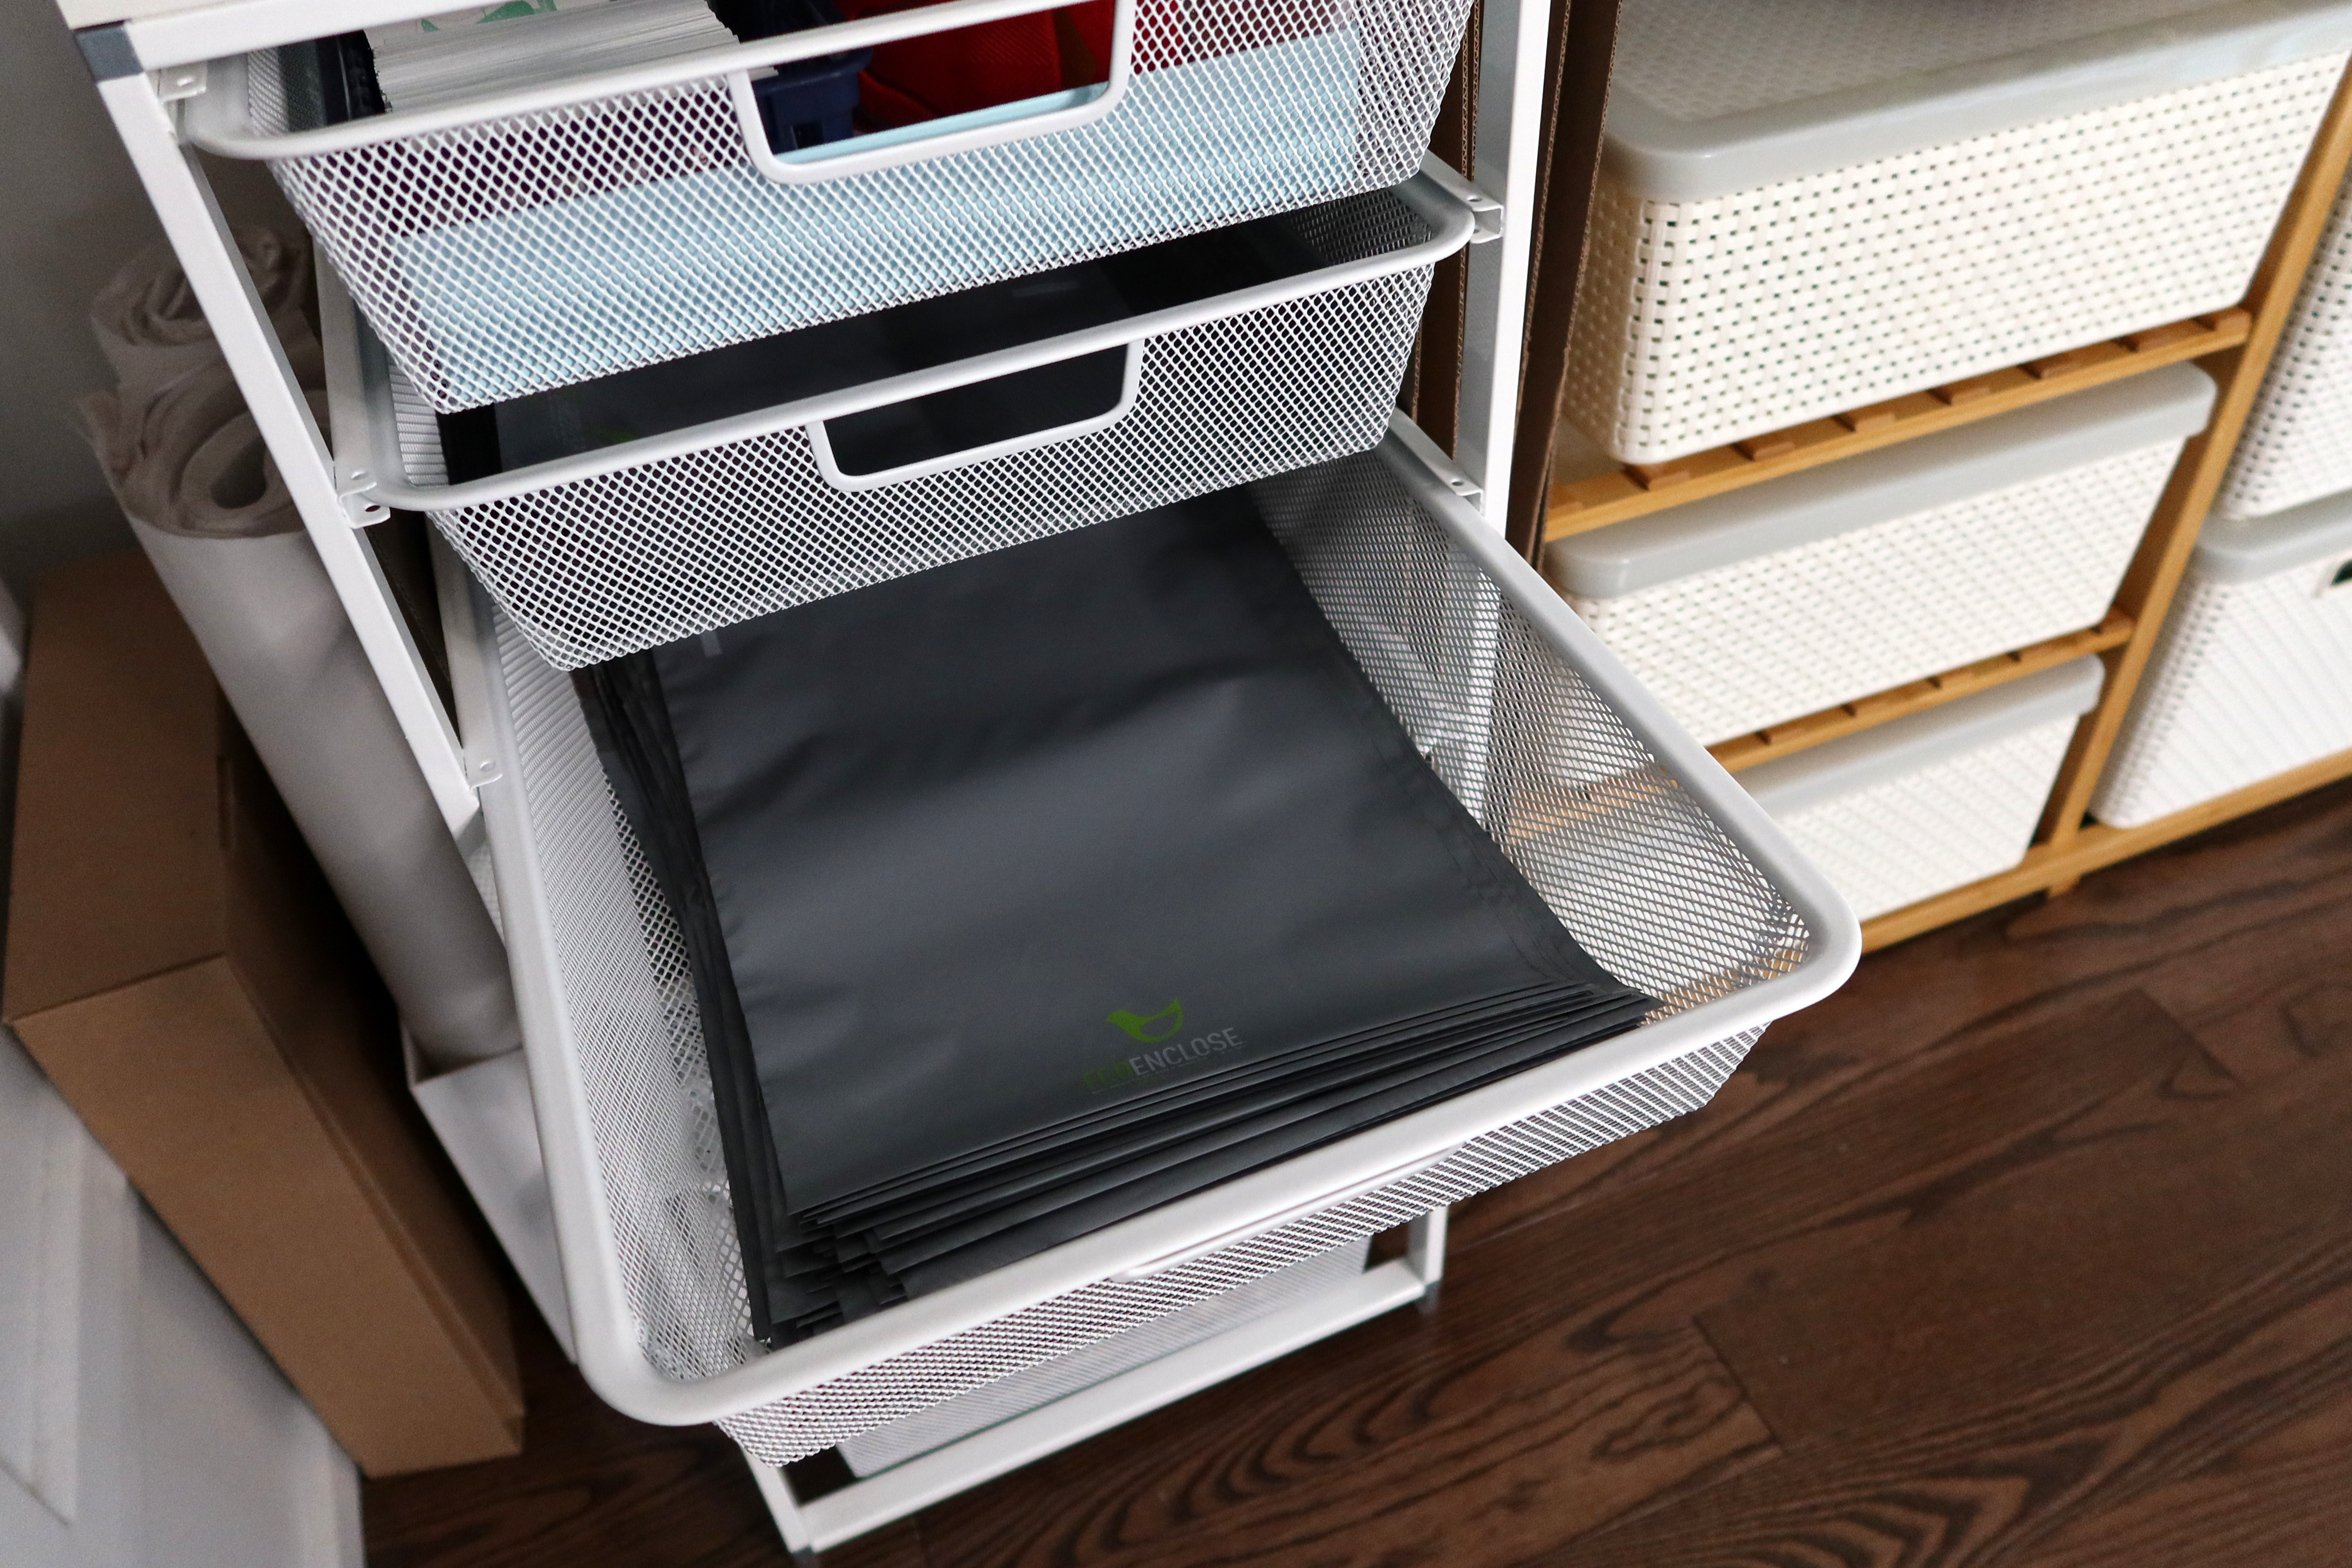
I have also been struggling with how to organize my poly mailers, and decided on this storage rack from The Container Store – and it’s been so great! I can store all my packaging materials, and each drawer gets a different size bag. The top holds my label printer, shipping scale and tape dispenser. Right next to the unit is my tissue paper.

While I have all this glorious space, I do keep my fabric swatch collection elsewhere. We have a few closets in our basement and one of them has shelves which I use for all my fabric swatches and swatch books. This definitely keeps my sewing space clearer, because I have a lot of swatches. (I can’t photograph this right now because our basement had a little water with Hurricane Ida and everything is a bit all over the place, but thankfully all my swatches were ok!)

Something else that really helped my space is general decluttering. Since I’ve been sewing for 16 years, I’ve accumulated a lot of fabric. Fabric I bought when first starting out, fabric that’s been given to me, or fabrics part of impulse purchases and overbuying. I had 5 garbage bags filled with fabric I no longer wanted. The quick solution would have been to drop it off at a thrift store and be done, but I tried to find a good home for it all. I reached out to a local church thrift shop to see if they could sell it, use it, or knew of someone who would want it. They put me in contact with someone who was more than happy to take it and I was able to organize a pick up. Being able to part ways with old fabric was so mentally clearing, and being able to pass it onto someone who could use it made my heart so happy.

I often think back to when I first started sewing, and remember my machine in my bedroom (on this green desk I’m using right now to type this out!) and using my parent’s kitchen table to cut out fabric. I experience so many moments of gratitude that I get to work from this space, and fill it with things I love. I am so excited to work in this space for years to come.

inspiration · Janome Sewing · refashion · sewing · Tutorials

I’m Teaching at the Sewing and Stitchery Expo!

Happy New Year! I hope everyone had a wonderful (and safe) holiday season! I have a bit of a different post to share today but something I am really excited about!

I will be teaching at the Sewing and Stitchery Expo!

The expo is February 24th -28th 2021 and I am teaching two classes:

My Upcycled Wedding Jacket with Embroidery

One Needle Class: 1124 Upcycling with Embroidery
FRIDAY, 4:00 - 4:45 PM (PST)
SUNDAY, 12:00 - 12:45 PM (PST)
Give old clothes a new look with machine embroidery! This class is centered around inspiration and
learning techniques for adding machine embroidery to apparel.

Double sided zip pouch made with fabric swatches!

3133 Upcycle Swatch Book Fabrics into a Zipper Pouch
THURSDAY, 5:00 - 7:30 PM (PST)
SATURDAY, 11:00 AM - 1:30 PM (PST)
Swatch books are filled with beautiful fabrics that can be turned into something useful! Turn two coordinating fabric swatches into a small zipper pouch. You’ll learn how to make a lined, flat bottom bag with a zipper close.
$5 project kit.

This year’s expo is virtual, so you can access the expo from your desktop, laptop, tablet or smartphone! Purchased classes will also be recorded and available for a limited time after the live class.

Both classes I will be teaching are focused around sustainability and using your sewing skills to encourage upcycling!

My first class, Upcycling with Embroidery, is a lecture style class where I will be sharing projects, ideas and tips to add machine embroidery to old clothes. This class is open to all skill levels, and I welcome anyone to attend even if you don’t currently own an embroidery machine! One Needle Classes are $6, and 45 minutes long.

My second class is a project class, meaning you will need a sewing machine (preferably with a zipper foot) and iron/ironing board to do the project. Three Needle classes are $30 and there is a kit that will need to be purchased for this class, which is $5 and includes fabric and zipper for your project. This is a great class for beginner sewists who are looking to make a project with a zipper! I will be sending kits with fabric swatches, so you can see exactly what I use to make the bags that are in my etsy shop! Three needle classes are 2.5 hours long.

Registration opens tomorrow, January 12th! And please note, registration for classes with project kits will close February 2, 2021 to allow time for shipping, which includes my swatch book class.

If the expo is something you’ve been thinking about attending, or are already set to register, I hope you consider one or both of my classes! I would love to see you there!

Click here for the full 2021 Sewing and Stitchery Expo Catalog

etsy · fashion revolution · inspiration

Shop Small : Upcycled and Recycled Businesses

Hello and welcome back to another blog post where I’ve scoured the internet for businesses doing things different and shared them with you! I really love putting resources like this together, and I hope you get something out of it like I do when finding these amazing companies.

Looking for other informative posts?

Read about where to donate/send your old textiles in Clothes Are Not Trash

Shop Deadstock, Reclaimed and Vintage Fabrics for all your sewing projects!

This year has been a whirlwind. I think everyone feels that way. Holidays and gifts are very possibly the last thing on your mind. And if you aren’t gifting this year, consider treating yourself, supporting a small, sustainable business or sharing this post with a friend who may find a new company to love and support. And as always, if there is a business you think should be included in this list, let me know!

(please note different shipping times and each individual shop policy.)

Apparel:

  • Zero Waste Daniel (US): One of my favorite sustainable apparel companies! Zero Waste Daniel is leading the force for sustainable clothing, using fabric scraps in their apparel collections, and most recently, their mask collection!
  • Silly Girls Club (International): I’ve been following Silly Girl’s Club on Instagram for a while now and love the company’s fun fashion! This shop specializes in making clothes, fanny packs and other fun accessories from upcycled kids cartoon bed sheets!
  • Wasi Clothing (US): I found Wasi Clothing from a video on TikTok talking about working with deastock fabric! Their clothing is so cute and I really love the commitment to using deadstock fabrics and sustainable sources!
  • Grant BLVD (US): Apparel company where all the garments are made using reclaimed and deadstock fabrics! I really love their reclaimed screen-printed collection!

  • Archivist (International): Looking for a new classic button up to add to your wardrobe? These are made from upcycled luxury hotel linens! It looks like there’s more to come for this company – so keep an eye out!
  • Miracle Eye (US): An amazing business selling handmade clothes, and straight from their site, “We work with vintage deadstock recycled fabrics as much as possible to remain as sustainable & waste-free as we can”. I got lost by all the fantastic photos on their site!
  • Psychic Outlaw (US): These upcycled quilt jackets and bandana dresses have been inspiring sewists all over Instagram! You can send in a quilt of your own to be transformed or purchase one of their found quilts!
  • Nothing New Shoes (US): Classic style sneakers made with up-cycled plastic. The uppers, laces, tongue label, and footbed liner are all made of 100% recycled post-consumer plastic!
  • Erin Elsie (US): Really fun handmade apparel and accessories made with reclaimed apparel and fabrics!

Bags/Accessories:

  • Scenery Bags (US): So I don’t like to have favorites, but this one tops it for me with creativity and sustainability. Scenery Bags takes retired theatrical materials and turns them into bags based on the show they are from! They also make jewelry from stage floors! And to make this company even cooler, 10% of proceeds from every sale is donated to TDF to take kids to see theatre!

  • Off Chutes (US): Upcycled parachute and paraglider accessories! Wallets, key fobs, tote bags and more!
  • Friends International (Part of the Global Goods Partners) : Fair trade bags made from recycled tires! From their site, “Friends International aims to reduce the number of children living or working on the streets by providing stable jobs and sufficient incomes to their parents.”
  • The Upcycled Movement: (Ireland): Bags and accessories made from wetsuits! This collection of upcycled pieces also gives back – 10% goes to Seal Rescue Ireland!

  • Rareform (US): Rareform upcycles billboards into bags and accessories! Their upcycled products include surf board bags, cooler bags, laptop sleeves and more!
  • Honey Darlin (US): Amy, seamstress behind Amy Nicole Studio, sells bags, apparel and accessories made from vintage and reclaimed materials!
  • Suave Kenya (International): Beautiful upcycled bags where materials are sourced from open air markets!

Home:

  • The Little Market: Glassware made from recycled glass by artisans in Mexico! Shop the entire Little Market site for other fair trade & artisan made finds.
  • Irish Glass (US): Shot glasses, planters and candles made from recycled beer bottles!
  • Vinylux – Uncommon Goods (US): Upcycled Vinyl from coasters to Bluetooth Speaker! You can also shop through Jeff Davis’ site, which has a few different pieces.

Jewelry:

  • Coffee Pod Creations (UK): Maker Vicky Knight transforms used coffee pods into beautiful jewelry!
  • CrapBagBananaHammock (US): Upcycled game pieces – made into jewelry, coasters, keychains, ornaments, etc!
  • MyAlterEco (US): Upcycled jewelry, beautiful tin earrings!
  • Zass (US): Mother/Daughter team making gorgeous upcycled jewelry – check out their “Brew Collection

  • Reasons and Rhymes (US): Reclaimed wood earrings – beautiful product and beautiful packaging!
  • CRAVE by CRV (US): Upcycled Jewelry and accessories made from old clothes and dilapidated kiddie pools!
  • Undone Clothing (US): Upcycled tape measure jewelry and accessories – my favorite from this shop is the upcycled film reel gift packaging!

Kids:

  • Beeper Bebe (US): The sweetest stuffies and plushies! Each handmade piece is made with upcycled materials or eco friendly new materials. A stuffed octopus made from t-shirts? Yes, even as an adult I want one!
  • Green Toys (US): A toy company made 100% from recycled milk jugs! No glue, metal, screws or paint! They feature toys like vehicles, jump ropes, stacking and tub toys, etc!

Other:

  • Lionshed Designs (UK): Upcycled VHS tape notebooks! What did they do with the VHS tapes you may ask? Turned them into planters!
  • Couch Guitar Straps (US): Deadstock and Reclaimed fabrics make up some seriously awesome guitar and camera straps. They are made of at least 25% recycled materials, including deadstock fabrics and seatbelts! Shop also sells belts, wallets and drum accessories.
  • The Ugly Company (US): upcycled “ugly” fruit into dried fruit snacks! Food Waste is a serious issue and The Ugly Company is helping to combat waste by turning it into their products! They offer nectarines, apricots, kiwis, and peaches!
  • Hudson Houndstooth (US): A company for pet accessories! Handmade pieces made with reclaimed and recycled materials including bow ties, bandanas, tug toys and waste bag holders!

Sports Equipment/ Profession Based:

  • Vintage Golf Gifts (US): Some really cool products made from repurposed golf clubs! They have bottle openers, lamps, clocks and even furniture!
  • Recycled Sports Equipment – Uncommon Goods (US): I’ve bought a few things from Uncommon Goods, especially since they like to focus on small business and fair trade options. Here’s a whole section of items made from recycled sporting equipment! (Prices vary but I love the upcycled hockey stick snow brush and BBQ set!)
  • SeshNotStigma (UK): Recycled skateboard jewelry and accessories including keychains, phone cases and clocks!

  • BoardThing (International): This shop specializes in rings made from recycled skateboards!
  • Recycled Firefighter (US): Making wallets, bags and belts out of decommissioned fire hoses!
  • Firefighter Turn Out Bag (US): Sells upcycled bags made from old firefighting gear. You can also send in your old gear for a custom bag! (As seen on Shark Tank)
  • Sword and Plough (US): Upcycled bags and accessories made out of repurposed military surplus and durable military grade materials. Purchases help empower veteran employment, reduce waste, and they donate 10% of profits to impactful veteran initiatives!

One more business to add to this list, mine!

I absolutely love creating bags and accessories with reclaimed fabrics and upcycled fabric swatches. There is so much textile waste in the world, I love helping bring new life to materials that would have otherwise been thrown away! You can shop my handmade pieces on etsy!

Gathering businesses for this list was really exciting. It was so fun to see how people are innovating their products and trying to make our planet greener and I really hope you can walk away from this list saying “no way, that’s so cool!” at least once!

If you know of another great upcycled/recycled business or want to share your own, leave a link down below! Be sure to tell us what you make and the best way to shop!

#RefashionFriday · inspiration · refashion · sewing

#RefashionFriday Blazer to Moto Jacket Refashion

Happy Friday! The refashioning world has been on fire for some time and it is so awesome to see other people taking clothing and making it into something new! I am so happy to see other people watching their apparel intake and re-using things they already own, or buying second hand instead of new!

I have a few links from around the web to share:

1. A mall in Sweden is 100% committed to recycled and upcycled goods. A small mall featuring 14 specialty shops sell their goods, and teach others to upcycle! I would love for a mall like this in New Jersey, and would most definitely have a store! Read about it HERE.

2. Looking to get paid for your old t-shirts? Send them to this company! Marine Layer will pay you $5 for your old tee (up to $25) and re-spin it into a new tee! Order a kit or shop their collection HERE. I am super curious about this myself and have to go through Drew’s closet to get rid of some of his tees!

3. I’ve been a fan of ThredUp for years, and they recently released a clothing line geared towards sustainability! Their collection Remade was created with the garments second life in mind. It is a collection of basics that ThredUp guarantees to take back and pay out 40% of original cost when you are finished with the item. I absolutely love the idea, but do wish it was taken a step further and that the items were created with sustainable fabrics. There isn’t much info on the creation of the line, but the clothes are fairly inexpensive so production lines are still a little blurred. But I’m happy to say it is a step in the right direction! Shop Remade HERE.

Whew!

So much good recycling happening in the world! Now it’s time to share my own!

#RefashionFriday Blazer to Moto Jacket - Trish Stitched

I love a huge refashioning challenge. I can’t do them too often because the ideas just don’t come all the time, but when I get hit in the head with a crazy idea, I have to try it out. I really wanted to sew something floral. It’s been awhile since my wardrobe has seen a new floral piece and I miss my colorful apparel. I had this blazer hanging in my refashioning closet for months – probably purchased last summer – and was trying to figure out what to turn it into.

Then pinterest did it’s magical work and I saw a motorcycle jacket online and thought “how cool would it be to turn a blazer into a moto jacket. I wonder if that’s possible”…. and down the rabbit hole I went to see if it has been done before and gather inspiration photos!

Over-sized blazers have been in and out of fashion for years. This particular one had a lot of length, and that was the first thing to go. Since it was longer, I was able to cut the pockets right off and not have to worry about them.

#RefashionFriday Blazer to Moto Jacket - Trish Stitched#RefashionFriday Blazer to Moto Jacket - Trish Stitched

I thought the hardest part of this refashion was going to be the zipper. But it actually turned out to be pretty easy. I was able to open the lapel seam directly on one side to insert the zipper. The second side was also easy to put in. My blazer had an interior facing that I was able to trace, then used that line to put in the zipper.

#RefashionFriday Blazer to Moto Jacket - Trish Stitched#RefashionFriday Blazer to Moto Jacket - Trish Stitched

The next step was adding in the zippered welt pockets. I have a moto jacket with zippered pockets, so I took similar measurements for my jacket.  After inserting the pockets I created a lining for the sides. The back of the blazer already had a lining so I just had to add the sides.

#RefashionFriday Blazer to Moto Jacket - Trish Stitched#RefashionFriday Blazer to Moto Jacket - Trish Stitched

The hardest part of this refashion was the sleeves. And I’m still not 100% thrilled with them, but until I decide what to do, they work well!

#RefashionFriday Blazer to Moto Jacket - Trish Stitched#RefashionFriday Blazer to Moto Jacket - Trish Stitched

I originally wanted to take the same fabric I took for the lining to make the sleeves but after shaping, the fabric was too rough for a comfortable sleeve. I’m not sure if I want to get a new sleeve fabric, or leave the sleeves as is. I am also curious about adding sleeve zippers, but instead of throwing this to the side waiting until I decided, I wanted to have a finished product. So I re-sized the sleeves and put them back in!

#RefashionFriday Blazer to Moto Jacket - Trish Stitched#RefashionFriday Blazer to Moto Jacket - Trish Stitched#RefashionFriday Blazer to Moto Jacket - Trish Stitched

I took some video of the process, but I’m not really sure how it came out. There were a few steps I did, then un-did, so it’s going to take awhile to make a video – if I look enough to explain the process! Now that I know how to do it, I really want to find another blazer to do this with. Fingers crossed I can find the perfect one to replicate!

Inspiration:

There were several cool blazer refashions after The Refashioners suit competition last year including this one from Heather over at Closet Case Patterns :

Refashioned-blazer_Heather-Lou-4

A Pair and A Spare came up with this refashion to turn a blazer into an off the shoulder top:

compare-1

Or turn a blazer into a cape like this DIY:

DKNY-vs-DIY-1

(Or watch another cape DIY on youtube here)


Have a recent refashion? I would love to see it! Leave a link below or email me at trish@trishstitched.com! Have a great weekend!


#RefashionFriday · inspiration

#RefashionFriday: Refashion Inspiration!

Happy Friday everyone! I have a whole bunch of projects in the works but nothing is finished so I thought I would share a few of the refashions I’ve been falling in love with lately! The refashioning world has been on fire lately, and there is so much inspiration all around!

Refashion Inspiration


1. Jeans to Overall Dress Refashion – Sew Much Love, Mary


Refashion Inspiration

This amazing refashion is adorable, colorful and so creative! Mary also has a photo tutorial on her blog to help you to make your own version! Yes, I am totally looking at my denim collection right now!


2. Skirt to Jumper Refashion – Chickie WU (ICanWorkWithThat.blogspot.com)

Refashion Inspiration

Don’t have an old pair of pants to cut up? How about using a skirt like Chickie! Such a good upcycle, and great use of the fringe hem!


3. DIY Faux Fur Purse Upcycle- Sarah (Our Life is Beautiful)

top-10-elegant-3

Sarah over at Our Life Is Beautiful (aka the queen of refashioning) shared this upcycle which is the perfect “no sew” update! Get the tutorial on her blog!


4. Fringe Dress Refashion – Heather Handmade

Refashion Inspiration

Heather always has clever refashions and I love this simple update she recently shared! This would be great to update a dress rather than buy one of make one from scratch for any holiday party you have coming up! Get the tutorial on her blog!


5. Downsize a Sherpa Coat – Cotton and Curls

Refashion Inspiration

These coats had a major moment a few years ago, and I know that both my sister and I had one! Update it with a simple shorten and tuck in to use it as a layering piece all winter!


6. Sweatshirt Upcycle – Portia from Makery 

Refashion Inspiration

This cute sweatshirt is from Portia over at Makery.co, and in the latest issue of Simply Sewing Mag! I have to get my hands on a copy to make this!


7. Dress to Two Piece Refashion – Sewing With Jirah

IMG_9433 (2)

I saw this refashion on instagram and fell in love! The print it great, and that top is so cute – makes me want to travel somewhere tropical! This is definitely better as a two piece!


What did I tell you? Some AMAZING inspirations around the internet lately! Have you seen any recent refashions that inspired you? I’d love to see them!

#RefashionFriday · inspiration · refashion · sewing · Tutorials

#RefashionFriday Easy Top Refashion

Happy Friday! If you are reading from anywhere by me, happy snow day! We got quite a few inches, and it’s pretty messy out there. So it’s the perfect time for #snowdaysewday! And that’s exactly what I’ve been doing, sewing!

I have a new refashion to share, and it’s such an easy one – you can do it with a top in your own wardrobe right now!

A little backstory on this shirt: I didn’t buy this until the third time I saw it. I fell in love with the print, but didn’t need a new refashion project, so I left it behind, especially since it didn’t have any tears or stains, it could be worn as is. Second time seeing it, I still loved it, but I still passed. When it was there the third time around, I knew it was a sign that I had to get it. I gave others plenty of time to buy it, but it sat and needed a little love. (and a few less shoulder pads!)

#RefashionFriday Easy Top Refashion - Trish Stitched

Since I had to resize, that was the first step. I removed the sleeves and took in about 2″ on each side. I did taper it out, so my sides stayed wider towards the bottom.

#RefashionFriday Easy Blouse Refashion - Trish Stitched#RefashionFriday Easy Blouse Refashion - Trish Stitched

With the shirt inside out, on the back, mark from underarm-underarm, about 1″ under the line where the underarms meet. Seam rip the sides up to that point, and a little more for your seam allowance, I did an extra 1/4″. (I like to keep my seam allowances smaller).

#RefashionFriday Easy Blouse Refashion - Trish Stitched#RefashionFriday Easy Blouse Refashion - Trish Stitched

The line previously drawn is where we cut! Cut the back piece away.

For the contrast back, I used an old tank top in my refashion pile. If you don’t have an old top, use the cut off back to draft a new piece, add a hem as long as you want!

RefashionFriday

Cut the new back to desired length. For mine, I cut straight across the underarm!

#RefashionFriday Easy Blouse Refashion - Trish Stitched

Next step, attach the new back! Start by attaching the top printed back to the new back (wrong sides together), before sewing the sides. I had a little extra fabric in my printed shirt, but made a little pleat in the center to account for it.

For my resized top, I had to hem the front up before attaching the sides, since my tank hem was already finished.

#RefashionFriday Easy Blouse Refashion - Trish Stitched

If needed, resize the sleeves, and you are done! I also turned the existing cuff up again to shorten the sleeve.

#RefashionFriday Easy Blouse Refashion - Trish Stitched#RefashionFriday Easy Blouse Refashion - Trish Stitched

I really do love how this top turned out, and how easy it was to give it a little face lift!

#RefashionFriday Easy Top Refashion - Trish Stitched#RefashionFriday Easy Top Refashion - Trish Stitched#RefashionFriday Easy Top Refashion - Trish Stitched


Looking for a little more blouse inspiration?

This refashion from etsy is a beautiful example of mixing fabrics.

Refashion Ideas

This top is a great idea for those shirts a little too tight (original link broken)

Refashion Ideas

And this refashion is too good not to share. If you have two similar shirts, or want to mix up a favorite shirt, how about something like this?

Refashion Ideas

Happy Friday!

Home Sweet Home · inspiration

New Sewing Studio!

The past few weeks have been super busy around our home! We’ve had a few inspection/ maintenance work appointments, our new couches will be here soon, and the floor in my studio was just finished!

ACS_0126[2870]Trish Stitched

When we were house hunting, my main priority was finding a home with a dedicated sewing space ( I know, I know, priorities! haha). We saw a lot of houses that offered an extra room, but to be honest, the idea of having my sewing studio in a “spare bedroom” was less than desirable. I really wanted an attic space, where I could go upstairs and shut out the rest of the house and just work. Being away from the rest of the house would allow me to not look out the door and see the cleaning I had to do, or remind me to do all the laundry.

Working from home (as I talked about before) can be really daunting and overwhelming. I wanted a place I could completely transform, and an attic fit the bill. We were extremely fortunate to win the house we did, but I felt even luckier because the attic was already finished!

When we moved in, the attic was split into two, a wall down the middle, with a spare bedroom on one side and a small office space on the other. The very first thing I wanted to do was tear down the wall. And the second thing was rip up the hideous carpet.

Drew didn’t want to tear down the wall. He was super against it and was afraid we would lose value in the house. We “compromised” by agreeing to cut an arch in the wall, so the small closet would remain. THANKFULLY, the contractor was on my side about tearing it down completely, and Drew finally came to his senses.

During the home inspection, we saw that there was decent flooring under the carpet, so we thought it would be a quick staining and finishing and we would be good to go! Well, we now know why the previous owners put down carpet. The floor was painted different colors.

After realizing this project was going to need a lot more time and money than initially planned, I started getting really frustrated that my space just wasn’t ready. We decided to paint the floor, and set out researching how to DIY it, since it seemed quick and inexpensive.

After a lot of hemming and hawing, and researching paint and not finding the right color, Drew and I decided to get the floor refinished- this way we would be keeping the original floor, and it would add value back to the house.

However, the floor had a lot of problems. Not only was the paint an issue, but there were many holes and a whole section with patches of different wood. The quote we got to refinish was high, and it was suggested we get prefabricated flooring to cover it up, since there was no guarantee the paint would be able to be sanded off. We decided to do the prefab floor and went with oak flooring in an espresso stain.

And last week, my floor was finally finished and I could start moving upstairs! Here’s Before, During and After!

Trish StitchedTrish StitchedACS_0126[2870]Trish Stitched

I’ve been looking up studio inspiration on pinterest for months before we found a house – and after we were in contract on this house, I went all out with research, so I wanted to share some of my studio inspiration!  A lot of my current furniture won’t fit, so there isn’t too much I can bring upstairs yet. I’m planning on an Ikea trip in the next few weeks (and hopefully a stop at the Container Store!) so I’m making my shopping list now!

Here’s a few more views of my space!

Trish StitchedTrish StitchedIMG_7549[2866]

Since it’s an attic, the walls are slanted, and there’s a lot of unusable space with low ceilings, so my research is a little specific, but there’s still a lot of inspiration for any sewing space! It’s also a good thing I’m short because I can still make use of the smaller spots!

First things first. I have never had a work table, and my ironing board has always worked overtime as my general work space and ironing station. For the first time ever, I want a dedicated desk where I can pin and plan and make piles that would usually be on my ironing surface!

This is technically a kitchen island, but it’s the perfect height for a shorty like me, more affordable than traditional craft tables, and is big enough for projects without overwhelming the space!  I’ve been learning to think outside the box for researching craft room ideas and looking at kitchen islands opened up another world of options! I also wanted room for stools to sit when they aren’t in use, and this will allow me to store them underneath.

vadholma-kitchen-island-black__0603385_PE680793_S4

I don’t have a traditional closet, so no room to hang anything on doors, and no hidden shelving, but this shelving from Ikea is ideal for the space! I have a few hidden storage doors where I plan on holding a lot of my fabric, but these shelves can hold trinkets, and my pretty, displayable fabrics!

algot-wall-upright-shelves-white__0477071_PE616743_S4

I also like the idea of floating shelves, for buttons, hardware and baskets filled with all those little sewing notions we can’t live without. The wall space I have isn’t very high, but I’ll still have room for 3-4 shelves. These from etsy would go with my space beautifully.

317a83adc7de6c260a286467ee385a2c

I am able to use my current sewing desks, but I need a space for shipping. I mostly use poly mailers and tissue paper, so flat storage is important. I’m looking at these set-ups for inspo:

e28e4b299c9e9500fb3d72e04e22106e

39456163711639a9364f5de7488f29e3

I love all the pegboard looks, but I don’t have too much wall space for them! Something longer and shorter would fit on my wall. I love the idea of scissors and marking tools in easy to reach places!

b7a528adcc21edcb1d75621fdac98b41

5123cba5c35fdd86998ddb3a566a0ecc

Half of the room doesn’t have much usable space, with the low ceiling, but there is a little bit of room for a reading nook! I can’t fit a full size chair, but some floor poufs and pillows would still make a cozy space. I need this corner to have easy to move pieces so I can still get in and out of the small door in the wall.

a83ca5ca4a0ee63cb19898bc9a279c3f

I’m also trying to control my color palette. I have a lot of white, brown and black pieces, but the big pop of color that keeps coming up is green. I’ve been trying to keep those colors in mind when shopping for things like rugs, pillows for my nook and fabric baskets for my accessories. I really want to maintain a “clean look” but still leave my space open for my love of color, so it’s just another aspect to keep in mind. Ultimately, I don’t want it to look like a jumble of mismatched pieces, which is my normal look!

Planning is definitely more specific for my space, but I love being able to take inspiration and make it smaller! Any tips for perfecting my sewing room?

#RefashionFriday · handmade wardrobe · inspiration · refashion · Uncategorized

#RefashionFriday Denim Jacket Re-mix

Happy Friday!

This refashion has been such a long time in the making, I am so excited to share it with you! The story for how this came about it a little long, so I wanted to share my photos in-between all that text!

DSC_0050

Before this refashion, the only denim jacket in my wardrobe was from middle school. I feel like I’ve mentioned that before here on the blog, but it’s true, my Gap Kids denim jacket is still getting its wear in my wardrobe. The sleeves are way too short, and the body looks awkwardly short with pants and shirts, so the arms always stay rolled, and I only wear it over dresses. I don’t wear it all that often, but I haven’t found a RTW version that I liked to replace it.

So when Seamwork Audrey came out, I knew it was a pattern to go on my “make list”. My initial thought was to make it out of recycled materials, because there is a crazy amount of used denim in the world! The only old jeans I had in my stash were a mix of light and dark denim and I just didn’t want that much shade difference to make it look super upcycled. Not having the proper pieces, I decided to wait to make it.

DSC_0034

A few weeks ago I was thrifting for some jeans for another project (I’ll share soon!) and had some leg remnants left over – as well as an extra pair I didn’t end up using for the other project. So I finally had a good amount of fabric to play with!

DSC_0100-001DSC_0017-006

The plan was in place, the materials gathered, I was ready. Then I saw this beautiful photo on pinterest and a little lightbulb went off in my head. I would finally be able to use this fabric remnant I’ve been dying to use!

We all have those pieces in our stash that you have a general idea for, and even though it doesn’t feel 100% right, there is an eventual purpose for that fabric. No, just me the hoarder? Alrighty then.  Well, I had this remnant I got from a friend and the print was so beautiful, I wanted to make a shirt for myself to enjoy the print. I was struggling with finding the right pattern and fabric to mix with it, and (if you zoom in on the photo) there were grommets on each panel, so the only true usable piece was the top corner. So this piece sat until I could spend more time on it. (I should also mention it’s similar to a quilting cotton)

IMG_6897[2602]

DSC_0041-001

After seeing that inspiration, I knew this fabric was destined to go with my new denim jacket.

I have a huge problem when it comes to sewing projects, because even if I have a whole pile of unfinished things, I need to start new ideas to constantly keep my mind flowing. So I left behind a dress due in a few weeks and cutting out new backpacks to make this jacket.

Seamwork’s goal has always been about quick projects you can finish in a few hours, and I’m not sure why my mind accepted that to be true for something like a denim jacket. They shifted their pattern’s a few months ago to be a little more detailed, so this project took way longer than expected. I was hoping to finish last week, but I really wanted to take more time to make it perfect, so I waited to share and I think it was worth it.

DSC_0055-002

Audrey has a lot of pattern pieces.  And since I’m tiny, my jeans are tiny, so I had a lot less fabric to work with – and I really had to stretch my thinking when cutting out the fabric. I used one pair of remnant jean legs, one full pair of jeans, and had to make the sleeves and a few other pieces out of fabric leftover from my handmade jeans, as well as using the fabric remnant for the back piece and pocket linings.  If you want to make your own recycled denim jacket, I would suggest to get 4-5 pairs, to be safe.

DSC_0188-001DSC_0176

I have seen versions of recycled denim jackets (scroll down to see more inspo!) and knew I wanted mine to have symmetry and purpose, not just a bunch of scraps thrown together. I made sure each side “matched” denim (ex. each center middle panel were cut from the same pair of jeans). When it comes to using multiple pieces to make something new, it really comes down to fabric placement to create the final look.

DSC_0119-003

Details about Audrey:

Cut: Size 2

Modifications to pattern: Added 1″ to the sides of Back Center Panel & removed 1″ from Back Side Panel.

Problem Areas: The welt pockets. I’ve made welt pockets before (Refashioned Bomber) but they are not commonly on my radar. Once I read the directions about 10 times to let them really sink in, it all clicked. Seamwork does have an article about Welt Pockets, which is a great resource as well.

Everything else went together smooth. I also ran out of topstitching thread, so not all areas have the pretty gold stitching, but I think it works out well that way.

DSC_0114-001DSC_0124DSC_0120-001DSC_0117-001DSC_0138-002

Details about my back modification: My fabric panel had this beautiful border and I wanted to use at least a bit of it on the back. To make this happen, I extended the back center panel 1″ on both sides, and took 1″ from the back side panel to account for the modification. I also quilted my back fabric to give it a little more body. It was a simple quilting, but adding batting and a backing, definitely gave the back a sturdier feel.

I added this lace leftover from my refashioned kimono right under the panel. Originally I had it going cross the entire back, but re-did it to go across just the panel as it looks cleaner.

DSC_0186-003

My hope for this jacket is to rough it up a little. It does have a worn in feel since it’s almost all used jeans, but taking some sand paper or a razor to a few sections is something I’m looking into. I also wouldn’t mind adding more trim if I come across cohesive trim I like. I really feel like this could turn into one of those pieces that stays in my wardrobe until I’m old and grey and my kids want to borrow it for a “retro feel”. I’m excited to see what adventures there are for this jacket in the future.

Inspiration: 

This etsy shop is filled with “festival style” denim jackets and it’s huuuuge embellishment inspo!

il_570xN.1153702354_gmyl

Add a little colored denim for a more unique look.

fa329eae74c020192dd330b1e32c37c1

or mix light and dark denim like this:

3f081fd9c7e1398f8fd08068e0ee56e3

The Pin that started it all.

lola-guarch-12-min-e1526550881709

The next jacket isn’t super related but I have to share because it’s amaaazing!

A girl after my own creative heart: Once Upon A Lauren was featured on Hoboken Girl awhile ago and I’ve been in love with her work since! Tell me this hand-painted leather jacket isn’t drop dead GORGEOUS! Thrift Upcycling at it’s finest!

il_570xN.1520508802_536s

If you spot a great denim or leather jacket at a thrift store, or have one gathering dust in the back of your closet, I hope this inspires you to have a little fun!

being ethical · inspiration

Haulternatives & What To Do After Fashion Revolution

Happy Monday! With Fashion Revolution week behind us, it may be easy to say “See you next year”, but around here, we want to encourage a Fashion Revolution all year long.  While most revolution-ers may be focused on asking brands who made our clothes, the goal of the week is to also inform about “Haulternatives” to shopping new and today I’m taking it a step further to talk about how to get rid of unwanted clothes, because even as makers, there are pieces we don’t want!

03SL2012BuyerarchyofNeeds

I’ve been on the search for the best way to dispose of unwanted clothes for years. Since my wardrobe isn’t 100% handmade, I still have store bought pieces I am slowly getting rid of because they no longer suit my style. My first instinct is always to refashion, but there are some pieces too good to chop up, and some too unusable to wear. I’ve done several things to limit my landfill waste when it comes to apparel including:

1.Selling online. Ebay is super easy to set up, and you get free listings every month, so you only pay when something sells! This is a great place for gently used clothing items that you actually want to get real money back for. Poshmark has also become a popular app, and a great one if you are constantly on your phone. A few other places are: Mercari, LetGo, and even Facebook Marketplace (although a few of these are more for furniture or tech pieces, I’ve seen clothing on them as well). Etsy is also an option – but the clothes must be “vintage” (over 20 years old) or have been altered in some way. (Etsy is also the best if you have handmade pieces to sell!)

When I’ve been on thrifting trips, I’ve actually picked up some items in the store that are New With Tags and have sold them online, making a small side income to support my fabric addiction. There are many people who make re-selling their full time job, and from my perspective, it’s such a great way to keep good clothes in circulation and getting them to the right customer.

2. Donate to ThredUp or a local location. ThredUp is an online thrift store that will pay you for your gently worn clothes. Fill up one of their polka dot bags, send it in and watch the money come in! You can use the funds to buy clothes through ThredUp, donate to a cause or cash out to buy more fabric! There are also local consignment shops that will give you cash for clothes and another favorite of mine is Plato’s Closet. These places will not give you a lot of money for your used goods, but it’s a great alternative to throwing them away, or dropping it in one of those “unknown clothing bins!”.

Worried about what they do if your clothes aren’t accepted? Here’s ThredUp’s response:

“We have high quality standards and typically accept less than 40% of the clothing we receive. Items that are still in great shape but don’t meet the thredUP standards are sold to third party sellers. Items that are no longer in wearable condition are passed onto our textile recycling partners and upcycled. The proceeds we recoup through this process help us cover some (but not all) of the shipping and labor costs incurred for the unaccepted items we receive.”

If you have specific items to donate, like a prom or wedding dress, a simple search will help you find local donation centers or charity events that look for these pieces! (and because I love making things as easy as possible, here’s a list of places to donate a wedding dress you may have: babble.com )

3. Recycle through H&M. They take any and all fabric/clothing waste & give you a coupon for the donation! What do they do with it? They re-distribute the good quality clothing for re-sale, upcycle the good pieces of material into new store collections and then recycle all the small scraps and unwearable pieces! This is the bag of scraps and failed sewing projects I brought in a few months ago. (and no, I didn’t use my coupon!)

IMG_4207[2140]

You can read more about their initiative here. I’ve come across a few people who are very opposed to H&M recycling program, saying that they don’t recycle as much as they claim to. While I don’t believe every single thing I read on the internet, I do trust that they are trying their best to make a change in this world, and putting greater power into recycling, so I am willing to give them a shot. They also have a pretty large voice in the industry, so I’m happy encourage their efforts!

Another alternative is to look up a recycling location with the Council for Textile Recycling. This council is something I’ve recently learned about but the mission is simple: Keep clothing, footwear and textiles out of landfills. They have a locator search tool to help you find places to donate used goods nearby. Near me, Goodwill takes old materials. I have heard that scrap bags and unusable materials should be labeled as such before donation – ask your local branch what they prefer.

clothing-life-cycle

Thrifting/second hand shopping is becoming one of the most popular forms of retail – and I don’t think that’s going to end any time soon. Take a look at the 2018 Fashion Resale Report by ThreadUP. Companies are listening to the demand of less fast fashion. They hear us, and they are making changes because now it’s either change or lose business.

02-01-closetoftheFuture-2x

As a maker, I am always on the lookout for recycled materials to use. My handbags use a lot of fabric swatches, which I got from a local interior designer and I just received my first order from Fab Scrap to use in my wardrobe!

IMG_5632[2142]

If you are unfamiliar with Fab Scrap, they are a company reducing waste in the apparel industry at the factory level. There is so much unused fabric in fashion collections, that most companies don’t know how to recycle or sell it. Enter: Fab Scrap, and now you can buy designer fabrics at cheap prices while supporting recycling efforts! You can buy scrap packs, which have smaller scraps or yard packs which include 5 + yards of curated materials. I bought a “warm pack” and asked for florals and solids to make blouses and dresses (silkier pieces) and they listened!

I hope my little series has inspired you to think about the pieces in your closet. Just because you don’t like something, doesn’t mean you have to keep it! Keep Fashion Revolution going by Refashioning, Recycling, and Consciously Shopping. These are all ways to help make our planet a little greener.

It’s such a great time to encourage others to take a step to think about their wardrobe as well. Want to encourage more handmade? Me Made May starts TOMORROW and you know I’m taking part! I use Me Made May to see the gaps in my handmade wardrobe and which pieces don’t get any wear. It’s also a time to push myself to finish a few projects I have hanging around to have another outfit or two for the month!

IMG_5744

I am really excited for this year’s Me Made May and can’t wait to be inspired by every one else’s wardrobes!

inspiration

Fashion Revolution Week: My Favorite Refashioners

Hello again, Fashion Revolutionaries! Today is all about spreading that refashioning love! I wanted to share my favorite refashioners to keep the DIY inspiration going! So lets get into it!

Before After[2136]

Pearl & Scissors is run by Hanna and her refashion archive is loaded with inspiration like this Skirt to Dress Refashion!

pearlandscissors

If you’ve looked up refashioners before, you have definitely come across Trash to Couture. She has done an incredible amount of refashions, most of them with tutorials so you can make your own versions! I loooove this dress makeover.

trashtocouture

Maybe it’s because she has a great eye for prints, or because her son is adorable, I love Melissa from Trevor Loves Mommy (lets be honest it’s both those reasons & more). She does a lot with florals, and I’m really partial to those refashions- just like with this dress to jumpsuit refashion!

trevorlovesmommy

I “met” Chickie Walsh (I Can Work With That)  through Instagram and loved her take on some classic pieces. You may remember my Cargo Pants to Vest Refashion – that was a direct copy from Chickie’s piece! She is constantly turning the old into new, like with this dress refashion!

icanworkwiththat

I recently came across A Pair and A Spare on Pinterest. I don’t know what took so long to find her, but I’m glad I did! Her refashions look so professional, and are super inspiring. A simple shorts refashion turned out so chic!

pairandaspare

Carissa Knits is a refashioning master. Seriously: Look at her page. I absolutely love what she did for the Jeans Refashioner Challenge in 2016!

carissaknits

Heather, from Heather Handmade, is such a sweetheart and her refashions are wonderful! I also can’t believe how much sewing she gets done with three kids- she’s Super Woman! This coat refashion is awesome and super special since it was her Grandma’s!

feathersflights

Amy Nicole is a fellow shortie, and one of the founders of the restyling exchange! She has such a cute style and even re-made her wedding dress!

amynicolestudio

Of course, the beautiful Sarah is on my list of favorites. Her refashions are always awe inspiring, and she is the sweetest person to read about. One of her latest refashions is so cute!

ourlifeisbeautiful

I’ve been following Lisa over at Pattern and Branch for some time, and always love her entries for the Refashioners. And she was the winner in 2015 with this look! She puts so much detail and love into each project!

patternandbranch

Whew, that’s A LOT of inspiration! These makers aren’t even all of my favorites! Have a favorite refashioner not on the list? Share below!