refashion · Tutorials

Nightgown to Pajama Set Refashion with 2nd Ave Thrift Store

I posted this upcycle a few week ago on Instagram but wanted to share the behind the scenes details here on the blog!

It had been well over a year since I had been “in person” thrifting, so when 2nd Ave Thrift Store reached out about collaborating on a project, I was all for it! This was my first time shopping in a 2nd Ave Store, but certainly won’t be my last. I was really impressed with the selection, and was so amazed by the size of the store!

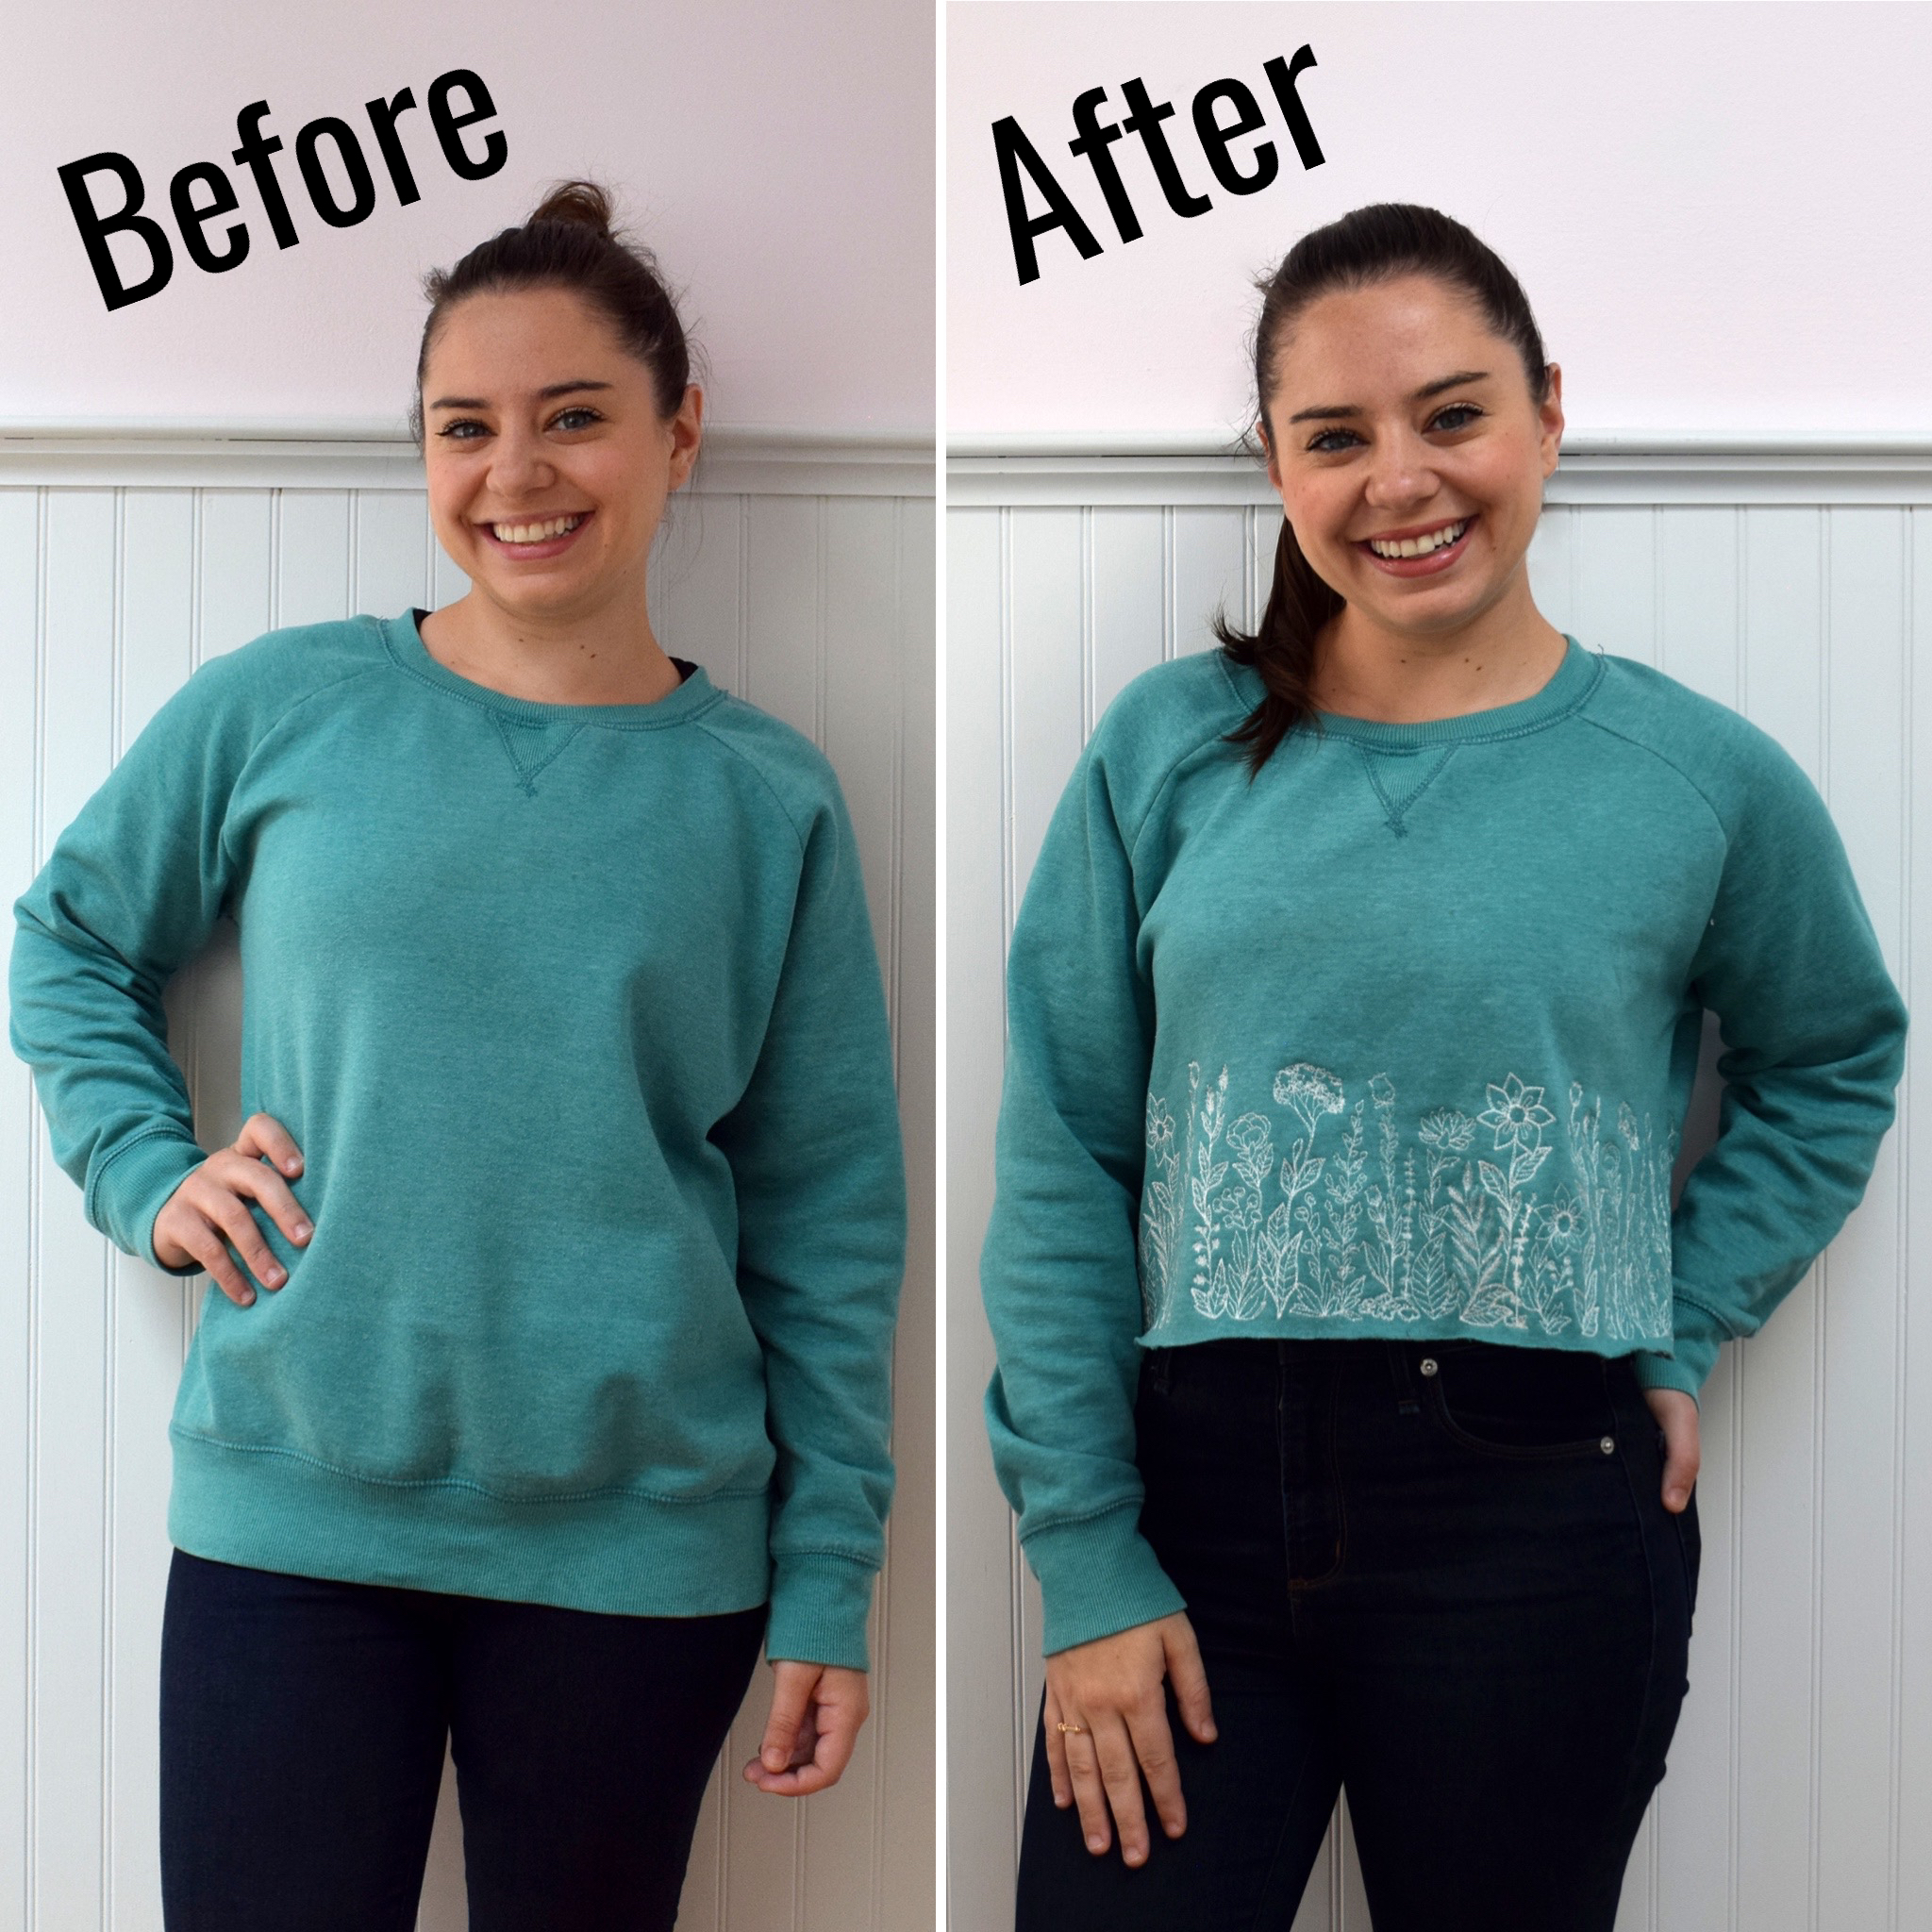
The first section I looked through was the dresses. There were some really great pieces – quite a few options still new with tags but I like to refashion pieces that are a bit more worn and well- loved. I turned around and was facing the pajama section when this adorable nightgown caught my eye. The dress was made from this comfy, cozy, cotton fabric that’s been washed quite a bit, and has such a pretty print.

There was a project I had planned in my head months prior but wasn’t able to find the right piece, but thought this nightgown would be a great option for my idea. I wanted to make a lounge set of matching top and shorts. I did have a moment before cutting where I thought about making a complete romper, but really wanted two seperate pieces that would be able to look like a romper when put together.

My plan was to cut out the shorts first, then that would determine the length of the top. The first step was to un-do the hem of the nightgown, which I was going to use for length on the shorts. When I undid the hem, the fabric was not very forgiving, and instead, I cut off the hem underneath the stitching holes to use that material for the drawstring waist.

There are a few ways to make the bottoms. You can use a pattern or trace a pair of shorts you already own (like I did with this refashion). I used the free Peppermint Spring Shorts pattern, but I squared off the bottom hem and made the rise higher because I wanted higher waisted shorts. The sides of the pattern lined up perfectly with the sides of my nightgown, which made this project easier.

After cutting the shorts, I was left with an angled top. I wanted to utilize as much of the fabric as I could so I cut the hem of the shirt into a curve.

I was originally going to fold the top of the shorts down a few inches and insert elastic, but I didn’t want to lose the height. I used the leftover fabric from the center of the nightgown to add an additional 2 1/2″ band to the waist. I did wind up cutting (and then immediately restitching) the original waistband height on the shorts. Doing this gave me the seam detail I wanted, and it made it easier to stitch in the ditch when closing the waistband.

My waistband has a piece of 2″ wide elastic, and two extra stitching lines to secure the elastic and for design. There’s an excellent tutorial on Melly Sews if you are looking to get a similar result.

It’s a bit hard to see in the before photo, but the sleeves were wider than I wanted, and the neckline was a bit low. I wanted to fix these fit issues for a more comfortable feel. To do this, I removed the sleeves, stitched the shoulder seams a few inches down, and the underarm seam to match. I brought in about 1/2″ from the shirt side seam for a cleaner fit as well, before re-attaching the sleeve.

After this alteration, I hemmed the shirt and the shorts to finish. I love this set! I love the fabric, and the print, and absolutely love that I can mix and match the pieces with different tops and bottoms in my wardrobe. And together they create an amazing faux romper!

It was wonderful to be out thrifting again! I missed the adventure of picking out pieces in person, and one of my favorite discoveries is that 2nd Ave also has a great linen section! There are about four rows of tablecloths, fabrics, sheets and bedding. Most thrift stores I’ve been to don’t have a large linen section, usually some bed sheets and maybe a few pillows, but I don’t often find a large selection of textiles in stores. This was an awesome find and I can’t wait to go back and look through those racks again! There are several 2nd Ave Stores in New Jersey, Pennsylvania, Maryland, and Virginia – check out all the locations here!

I also found an amazing piece to wear as is! It’s a vintage petite Liz Sport romper that came with a matching belt! I have to hem the shorts a little bit but I love this piece!

etsy · handbags · handmade wardrobe · refashion · sewing · Tutorials

Jeans to Pinafore Refashion

Hello, hello! In the past few months my apparel sewing has slowed down quite a bit and my bag making as been taking over! I’ve been working hard to add new bags to my Etsy shop, and finally designed and created my dream bag! (I’ll share more at the end of this post!)

But as the title says, my main reason for blogging today is to share my latest refashion! This piece has been several months in the making. I started dreaming about this project back in December! I wanted to share a little of my thought process, because it really was an idea that bounced around a bit before landing! One of the most common questions I get asked is where my ideas come from, so here’s how this one formed!

I had a pair of corduroy pants in my refashion pile, that I was stuck on what to do with. I started looking online for corduroy dresses, or jackets to gather some inspiration. I came across this adorable pinafore from Show Me Your Mumu, and started going down the pinafore rabbit hole!

I do quite a bit of fabric Tetris in my mind when figuring out if I can realistically make a refashion work. I knew if the pants were long enough, and I was able to cut them off with enough fabric to spare, this project would work.

I sat with the idea for a bit (some other projects got in the way of starting) and before I knew it the weather was warming up. I wasn’t motivated to sew with corduroy anymore, but the idea was still taking over in my mind. I started searching on ThredUP to find a replacement garment to bring the idea to life. Thankfully the perfect pair popped up in my search and the project was back on!

I started searching for a pattern for the bodice. (This is something that can be self drafted!) I came across the Amber Pinafore Dress from Named Clothing. I’ve had great luck with Named Patterns in the past so I knew it would be reliable for me. I tested the bodice with cotton fabric before cutting so I could work out any fit issues beforehand.

Now onto the tutorial! Sorry for the photo quality, I realized I was taking more video than photos for this project so some of these are from screenshots.

First, with the jeans on, mark knee length. This was my starting point to cut because I didn’t want to make my skirt too short. (I cut off an additional 2” once I had a better idea of length.)

Seam rip open each cut pant leg, leaving one side seam intact. Undo hem as well.

Cut bodice out of each pant leg. (For a better fit, the top of my bodice lined with the jean hem, and the bottom of the bodice lined up with my original pant cut line.) I traced my bodice piece onto each leg, making sure to match where the Jean seam line was for a consistent look. (Tip: mark on your pattern piece where seams need to hit!) Try to keep the bodice towards the ends of the leg to be sure you get the most use out of your fabric.

Once your bodice is cut, you can see how much fabric you have left to work with.

Next step is to turn the remaining jeans into the skirt. Going back to the top portion of your jeans, seam rip the inner legs.

On the front of the jeans, seam rip the fly section a few inches up, until the jeans can lay flat, and you can see the triangle start to form on the bottom. Don’t seam rip too far up, and don’t hit the fly zipper. This part of the project you may have to play around with a bit to get the right fit. Pin the triangle in place before adding any fabric, and try the skirt on to test the opening width.

Thankfully my front triangle didn’t need much fabric, so only a small portion of my fabric went into this section.

Continue this process for the skirt back as well. Seam rip the center back seam a few inches, and lay back flat. You may have to seam rip more on the back than the front. My opening was wider in the back, and I didn’t have enough material from one pant leg to properly fit. I stitched my remaining fabric together for a bigger insert. You can see I placed my new seam in the center of my insert, which takes extra time to pin and stitch properly, but creates a more finished look. I also folded the pant leg triangle sides in more to create a flatter piece.

The back was a bit harder for me to fit. I recommend pinning in place, then trying the skirt on to be sure it lays nicely.

After the inserts are finished, the rest of the material is for the straps! Now, on my pants, since I cut off an extra 2” from my original pants, I was able to use most of that for my straps. (You may not have that material to work with, but you can always make the back straps out of a coordinating fabric if you don’t have enough!) I had to add some length from my remaining fabric to extend the straps, as you can see with my seam lines.

My entire bodice is lined with cotton muslin. For reference, my straps were cut 2” wide and stitched with a 3/8” seam allowance.

Try your skirt on and pin bodice in place. I started by pinning the front, making sure to get my bodice pieces close to each other. Once front is pinned, pin back straps, making sure straps are comfortably tight. These will be pinned on an angle. Remove pinafore and double check the back straps to make sure their distance is even. If your jeans have belt loops, the back loop is a great center point to measure from. I hand stitched my bodice down, but you can certainly sew by machine.

To finish the skirt, I evened out my hem, serged the edge and hand stitched up 3/8”. I didn’t want to make my skirt any shorter, but this part is all personal preference!

What made this project work: mid-rise jeans. With the type of bodice I added, the waist of my jeans needed to come up, so starting with mid rise jeans meant they didn’t have to come up that much higher. This is something to consider if you want to make this style pinafore yourself, mid rise or high rise jeans would work best. If you have a pair of low rise jeans, you may have to re-fit the waist altogether and may not have enough material for the entire bodice (or you may have to build a different bodice. Search for “overall dresses” for another idea!)

Another tip, if you want more material to work with, use boot cut or flare jeans! My original jeans were technically a “crop pant” but because of my height, they were normal length skinny jean on me.

Want to go a step further? Add a little extra length to the bodice front and strap ends, and make the entire top removable with buttons! I did this for my skirt to overall pinafore refashion a few years back. It’s a great way to get more wear out of the garment! (Post here!)

And a quick note: here are the new bags I’ve been working on! These little crossbody bags have been in the works for years and I’m so incredibly excited with how they turned out! The exteriors are made from reclaimed and secondhand fabrics! Shop Crossbody’s on my Etsy!

Janome Sewing · Tutorials

DIY Embroidered Crop Pullover with Janome

Today I’m sharing a fun tutorial to upcycle an old pullover! One way or another, I wind up with a bunch of them in my wardrobe. This teal one came from my mom! She had worn it over the years and was ready to let it go, but before it ended up in the donation pile I took it to upcycle! This is a really fun refashion, and may take some time at the embroidery machine, but the end result is a really great piece (that I’ve already worn many times!)

Stitched on the most amazing Janome Machine : Horizon Quilt Maker Memory Craft 15000

Watch the full video tutorial here!

Here are the steps!

  • Take a pullover sweatshirt and find a good crop length. You can fold the hem under and test length in front of a mirror. Cut length off (I cut 7” off mine)
  • Mark center point on new bottom of pullover and line up embroidery hoop. Add stabilizer (I started with tear away but went to cut away mesh, which I preferred for this project) Leave a small space between the start of embroidery and hem of pullover (I left 3/8” blank on hem bottom). Embroider!
  • To add continual embroidery, measure the length of the embroidered design – this design measures 9 ½”. From the center point of your original design (4 ¾” is my center point), measure out the total length (9 ½”) to get the center point of your next design. This point will be the new center point in your hoop. If your garment has a flair, you may need to add ½” spacing (¼” on each side). Use your hoop template and the Trace Without Stitching key on Embroidery Machine to check your design.
  • I found it helpful to embroider on one side of the original embroidery first, then the other, so that my final embroidery would be done on the center back of the pullover. Continue with this all the way around the pullover.
  • If your design leaves a little extra space on the pullover, but not enough for a complete design, use your hoop template as a guide to fit the rest of a design. My design has two colors, so I needed to skip a few floral pieces. On your machine, use the Jump Key (Calculator) to skip patterns you don’t need and jump to the design you want. It is also helpful to have the Cross Key (+ button) on to see where the design is currently stitching.
  • Trim away stabilizer, give your pullover a quick press and wear!

Other project details:

Hoop: GR

Embroidery Design Used: Lovely Blooms by Urban Threads

handmade wardrobe · sewing

Botanical Myosotis Sheet Dress

For the past year, I’ve been obsessing over the “botanical” print t-shirts (like this one from Wholesome Culture) and started a search for one of my own. Last year they weren’t available secondhand since the style was still pretty new, so I turned my search to botanical print fabric, in hopes to recreate my own t-shirt. I came across this amazing bed sheet on Mercari, and when it arrived, the print was larger than I was expecting, so I thought it would look much better in dress form, to be able to show off more of the print.

I was going to wait until Spring to start this dress, but I kept seeing the fabric sitting in my sewing studio, and just couldn’t wait any longer! It is completely seasonally inappropriate but I had the motivation to make it so I went for it!

I decided to go with the Myosotis Dress pattern from Deer and Doe Patterns. It’s a silhouette that I think suits me well, and I really love the tiered skirt. I made Myosotis last summer out of fabric I bought in Paris two years ago, and love that dress! (I never got around to blogging it but I posted a photo over on Instagram.)

I made version A, without the sleeve ruffle. I tested the sleeve ruffle on my first Myosotis and wasn’t really in love with the look, so I kept it off of this version as well. I had a lot of fun with print placement on this dress, and since the florals were pretty big, I wanted to be sure they were showcased, and the different colors were sprawled all over the dress, not just stacked (i.e; yellow on bodice directly on top of yellow in skirt). I put some of my favorite florals on the bodice so the gathering wouldn’t disrupt the design. I loved the floral names on the sheet (one of the reasons I love the botanical shirts!) however I wasn’t able to keep all of them with all the florals, because of the seamlines, but they are sprinkled throughout so the detail I love is still incorporated in the dress.

The bodice is fully lined, but I didn’t line the skirt. This dress pattern doesn’t call for lining, so all seams are visible inside. I didn’t want to play around with adding a separate lining so before sewing, I lined each bodice piece. It is actually lined with old muslins, and whatever larger pieces I could find in my stash, so the back is lined with white and the front bodice is lined with natural muslin. A little patchworked but I wanted to use what I had! I also chose not to line the sleeves, so it looks a little strange from the inside.

I was thinking about lining the skirt but I would line it with cotton and I feel every time I line a dress with cotton, it gets static-y or clumpy and doesn’t fall properly. I have the option of removing the skirt and stitching each tier with lining before sewing them together, but I’m just not sure it is necessary. If anyone has any suggestions – I’m open to hear them!

A few more details on this dress include a couple of gold buttons from my vintage button stash and POCKETS!

A few notes on the pattern: I cut a size 38, and made no changes to the bodice or sleeves. This is a looser fitting dress, so while I could have sized down, the dress would have been harder to get over my head. This is one of the reasons I added the waist ties, so I could cinch in my waist a bit. I did cut down the skirt length to fit my shorter legs better. I made the tier skirt option and made the top tier 12″, cutting off about 1 5/8″. I left the length on the bottom tier. My total skirt length came to just over 19″ (with a 1/2″ hem). For reference, my inseam to the floor is 27″. Since this version is meant to be above the knee I didn’t have to alter too much, but if you are taller and looking to make this dress, that’s something you may want to note.

The botanical prints have become pretty popular and a google search produced multiple fabric options, as well as sheets. There are some stunning prints available on Spoonflower that you can get in cotton, although it can be expensive (and the mushroom fabric on Spoonflower is adorable!).

If you are on the lookout for some secondhand floral print sheets, I highly recommend checking sites like Etsy, Poshmark and Mercari. I have had luck at a few thrift stores for sheets (my favorite spot closed down due to COVID) but the more that people have been searching for secondhand sheets, the more there are being sold – it has become a huge selling niche in the secondhand market, much like quilts! Some keywords are “botanical” and “vintage floral”, these terms may help with results. Pricing can get insanely high, especially with name brand bedding, but with a little time spent searching, you can find a great deal – and with Poshmark and Mercari, you are able to offer a lower price.

The very last detail to share on this dress is the addition of one of my new labels! I was gifted these from Dutch Label Shop, and intend to use them for my handmade bags but this label is also the perfect finishing touch on this dress!

These labels are simply stunning. I’ve purchased from Dutch Label Shop before and am always happy with the quality, but this label goes above and beyond anything I was expecting. It is so cool to see my little logo on a label – and I am so, so happy to sew with them! (If you are looking to get labels for your handmade wardrobe or products, check out Dutch Label Shop and use trishstitched15% at checkout for 15% off!)

Have a wonderful Sunday!

inspiration · Janome Sewing · refashion · sewing · Tutorials

I’m Teaching at the Sewing and Stitchery Expo!

Happy New Year! I hope everyone had a wonderful (and safe) holiday season! I have a bit of a different post to share today but something I am really excited about!

I will be teaching at the Sewing and Stitchery Expo!

The expo is February 24th -28th 2021 and I am teaching two classes:

My Upcycled Wedding Jacket with Embroidery

One Needle Class: 1124 Upcycling with Embroidery
FRIDAY, 4:00 - 4:45 PM (PST)
SUNDAY, 12:00 - 12:45 PM (PST)
Give old clothes a new look with machine embroidery! This class is centered around inspiration and
learning techniques for adding machine embroidery to apparel.

Double sided zip pouch made with fabric swatches!

3133 Upcycle Swatch Book Fabrics into a Zipper Pouch
THURSDAY, 5:00 - 7:30 PM (PST)
SATURDAY, 11:00 AM - 1:30 PM (PST)
Swatch books are filled with beautiful fabrics that can be turned into something useful! Turn two coordinating fabric swatches into a small zipper pouch. You’ll learn how to make a lined, flat bottom bag with a zipper close.
$5 project kit.

This year’s expo is virtual, so you can access the expo from your desktop, laptop, tablet or smartphone! Purchased classes will also be recorded and available for a limited time after the live class.

Both classes I will be teaching are focused around sustainability and using your sewing skills to encourage upcycling!

My first class, Upcycling with Embroidery, is a lecture style class where I will be sharing projects, ideas and tips to add machine embroidery to old clothes. This class is open to all skill levels, and I welcome anyone to attend even if you don’t currently own an embroidery machine! One Needle Classes are $6, and 45 minutes long.

My second class is a project class, meaning you will need a sewing machine (preferably with a zipper foot) and iron/ironing board to do the project. Three Needle classes are $30 and there is a kit that will need to be purchased for this class, which is $5 and includes fabric and zipper for your project. This is a great class for beginner sewists who are looking to make a project with a zipper! I will be sending kits with fabric swatches, so you can see exactly what I use to make the bags that are in my etsy shop! Three needle classes are 2.5 hours long.

Registration opens tomorrow, January 12th! And please note, registration for classes with project kits will close February 2, 2021 to allow time for shipping, which includes my swatch book class.

If the expo is something you’ve been thinking about attending, or are already set to register, I hope you consider one or both of my classes! I would love to see you there!

Click here for the full 2021 Sewing and Stitchery Expo Catalog

Janome Sewing · sewing · Tutorials

DIY Embroidered Flare Jeans

Jeans are my favorite wardrobe staple. I wear jeans almost every day, and just about all them are skinny jeans. But it has been a great year to try different styles, like all the wide leg cropped pieces I’ve been making (here and here), and I have a whole box of secondhand jeans from ThredUp to create with!

ThredUp sent me a denim rescue box for another project, but since the box is 50 lbs of denim, I have a lot of jeans to work with! Rescue boxes are filled with unaccepted items for resale and unsold jeans from the site. In my box, there are a lot of jeans in great condition that are not my size and I plan on donating them. Since it is a rescue box, quite a few of the pairs are stretched out, or stained; completely unwearable in their current condition. I went through the box and there were a few pairs in my size, two that look and feel great! One is a pair of black skinny jeans, which I’ve been wanting for a while, and the other was this pair of Levis, which fit great except for the length! I was going to do a simple hem, but I thought this would be a fun moment to try something new.

Flare jeans came to mind and I started going down a little rabbit hole on pinterest. DIY flare jeans have been a popular tutorial for years with some of the most popular projects including adding a patterned fabric flare, or lace insert. While they look great, that isn’t the style I wanted for these jeans. I wanted a pair that looked a little more intentional, and I started seeing flare jeans made with denim inserts and embroidery, and really loved the idea. There are some beautiful pairs on Free People and Modcloth (sold out)!

I started looking at different embroidery designs and went through a few options. I wanted to do something like the inspiration pieces, with a full embroidered insert but couldn’t find the right florals, and decided to do something a little simpler.

I found a piece of denim remnant in my stash (from my very first pair of jeans!) that was a really close shade to my jeans. I also loved that this denim remnant had the raw edge, and while it doesn’t perfectly match the raw edge of my jeans, it still meshes well with the jeans.

Want to DIY your own pair? Here’s a quick step by step:

Mark the exterior jean side seam right under the knee. Seam rip the exterior seam up to this point, and reinforce the seam at the top so it doesn’t continue to unravel. I wanted my jeans to hit the floor when wearing heeled boots so I also let the hem down on my jeans (this is optional).

Cut a piece of fabric large enough for your embroidery hoop and trace the triangle for your insert before stitching. If you don’t want to add embroidery, you can cut inserts straight from your fabric. My insert measured 10.5″ x 18.5″ (the length of my insert + a little extra seam allowance)

Add your embroidery! Cut the insert out, and trim away interfacing. Pin inserts wrong sides together to jean openings. I pinned onto the original jean seam. At the insert tops, stitch up to the reinforced seam. If you are leaving your edges raw, you are done!

I want to get the edges a little rougher, so I’m excited to let them fray over time.

I really loved the fit of the jeans, and now love the added length so I can look a little taller than 4’10”! (Jeans photographed with one of my recent refashions!)

Embroidery design is Gilded Floral 23 from Embroidery Online!

sewing · sewing activewear

Arlo Track Jacket- Athleisure Set with Craft and Thrift Shop

I am so excited to once again be working with Amy from Craft and Thrift Shop! Amy is so passionate about sustainable fabrics and it shows in the pieces she offers on etsy. Amy carries vintage, secondhand and deadstock fabrics and has a wide selection of prints and solids, and fabrics ranging from knits to cottons and silks! Thank you so much to Craft and Thrift Shop for sponsoring this post! All fabric in this post is from Craft and Thrift Shop on Etsy, and scroll down for a coupon code!

This year I started out really strong with my physical activity, and ran the Disney Dopey Challenge (48.6 miles in one weekend) with my Dad. It was a lot of training and once the race weekend was over I gave myself a break. Then COVID and stay at home orders started and motivation to work out really left my mind. Throughout the year I’ve been trying to get back on track, and within the last few months I’ve been figuring out a schedule that works well for me and I’ve been putting in a lot of effort to become consistent!

Part of my motivation is coming from making wardrobe pieces for this area of my life. I LOVE making activewear, and while I have been thrifting a lot of my active wardrobe, I want to get back into making workout clothes!

My goal with this outfit was to make some post workout gear; some fun pieces of athleisure! I came across the Arlo Track Jacket from Friday Pattern Company and fell in love! I’ve been wanting an easy throw on and go jacket, perfect for cooling down outside after a workout, or even before the workout when the body is just warming up, and this jacket looked perfect!

I chose to make it with this beautiful mauve scuba fabric from Craft and Thrift Shop. This fabric was awesome to sew with and the perfect weight for a track jacket. Amy is a fellow sewist and knows the important details to add to the fabric description, and seeing that this material had 20% stretch let me know my dream of this fabric as an Arlo Track Jacket was possible. Click here to see all the Scuba in Amy’s shop!

This jacket was a great pattern to make! It is a unisex pattern with three lengths and option for color blocking. It came together easy and the instructions were wonderful (no second guessing any steps!). I made a size Small in the short length and overall, it has the perfect fit. What really drew me to this pattern was the seam lines. I love the detailing, and love all the topstitching. This is a great pattern for color blocking, or using up scraps. I also love the generous side pockets!

I had a good amount of fabric left over and figured out it was juuuuust enough to make a pair of cropped Hudson Pants! This makes my fourth pair of Hudson Joggers, and my first cropped pair. I love them to pieces and love that I have an awesome set now!

To pull the whole look together, I made a Rumi Tank from Christine Hayes out of this beautiful ribbed jersey from Craft and Thrift!

Here are some of my favorites from Craft and Thrift!

Burgundy Daisy Cotton Rayon

Yellow Plaid Cotton

Cotton Tucan Print

Forest Green Scuba

Shop Craft and Thrift with a 20% discount code! Use TRISH20 at checkout!

etsy · fashion revolution · inspiration

Shop Small : Upcycled and Recycled Businesses

Hello and welcome back to another blog post where I’ve scoured the internet for businesses doing things different and shared them with you! I really love putting resources like this together, and I hope you get something out of it like I do when finding these amazing companies.

Looking for other informative posts?

Read about where to donate/send your old textiles in Clothes Are Not Trash

Shop Deadstock, Reclaimed and Vintage Fabrics for all your sewing projects!

This year has been a whirlwind. I think everyone feels that way. Holidays and gifts are very possibly the last thing on your mind. And if you aren’t gifting this year, consider treating yourself, supporting a small, sustainable business or sharing this post with a friend who may find a new company to love and support. And as always, if there is a business you think should be included in this list, let me know!

(please note different shipping times and each individual shop policy.)

Apparel:

  • Zero Waste Daniel (US): One of my favorite sustainable apparel companies! Zero Waste Daniel is leading the force for sustainable clothing, using fabric scraps in their apparel collections, and most recently, their mask collection!
  • Silly Girls Club (International): I’ve been following Silly Girl’s Club on Instagram for a while now and love the company’s fun fashion! This shop specializes in making clothes, fanny packs and other fun accessories from upcycled kids cartoon bed sheets!
  • Wasi Clothing (US): I found Wasi Clothing from a video on TikTok talking about working with deastock fabric! Their clothing is so cute and I really love the commitment to using deadstock fabrics and sustainable sources!
  • Grant BLVD (US): Apparel company where all the garments are made using reclaimed and deadstock fabrics! I really love their reclaimed screen-printed collection!

  • Archivist (International): Looking for a new classic button up to add to your wardrobe? These are made from upcycled luxury hotel linens! It looks like there’s more to come for this company – so keep an eye out!
  • Miracle Eye (US): An amazing business selling handmade clothes, and straight from their site, “We work with vintage deadstock recycled fabrics as much as possible to remain as sustainable & waste-free as we can”. I got lost by all the fantastic photos on their site!
  • Psychic Outlaw (US): These upcycled quilt jackets and bandana dresses have been inspiring sewists all over Instagram! You can send in a quilt of your own to be transformed or purchase one of their found quilts!
  • Nothing New Shoes (US): Classic style sneakers made with up-cycled plastic. The uppers, laces, tongue label, and footbed liner are all made of 100% recycled post-consumer plastic!
  • Erin Elsie (US): Really fun handmade apparel and accessories made with reclaimed apparel and fabrics!

Bags/Accessories:

  • Scenery Bags (US): So I don’t like to have favorites, but this one tops it for me with creativity and sustainability. Scenery Bags takes retired theatrical materials and turns them into bags based on the show they are from! They also make jewelry from stage floors! And to make this company even cooler, 10% of proceeds from every sale is donated to TDF to take kids to see theatre!

  • Off Chutes (US): Upcycled parachute and paraglider accessories! Wallets, key fobs, tote bags and more!
  • Friends International (Part of the Global Goods Partners) : Fair trade bags made from recycled tires! From their site, “Friends International aims to reduce the number of children living or working on the streets by providing stable jobs and sufficient incomes to their parents.”
  • The Upcycled Movement: (Ireland): Bags and accessories made from wetsuits! This collection of upcycled pieces also gives back – 10% goes to Seal Rescue Ireland!

  • Rareform (US): Rareform upcycles billboards into bags and accessories! Their upcycled products include surf board bags, cooler bags, laptop sleeves and more!
  • Honey Darlin (US): Amy, seamstress behind Amy Nicole Studio, sells bags, apparel and accessories made from vintage and reclaimed materials!
  • Suave Kenya (International): Beautiful upcycled bags where materials are sourced from open air markets!

Home:

  • The Little Market: Glassware made from recycled glass by artisans in Mexico! Shop the entire Little Market site for other fair trade & artisan made finds.
  • Irish Glass (US): Shot glasses, planters and candles made from recycled beer bottles!
  • Vinylux – Uncommon Goods (US): Upcycled Vinyl from coasters to Bluetooth Speaker! You can also shop through Jeff Davis’ site, which has a few different pieces.

Jewelry:

  • Coffee Pod Creations (UK): Maker Vicky Knight transforms used coffee pods into beautiful jewelry!
  • CrapBagBananaHammock (US): Upcycled game pieces – made into jewelry, coasters, keychains, ornaments, etc!
  • MyAlterEco (US): Upcycled jewelry, beautiful tin earrings!
  • Zass (US): Mother/Daughter team making gorgeous upcycled jewelry – check out their “Brew Collection

  • Reasons and Rhymes (US): Reclaimed wood earrings – beautiful product and beautiful packaging!
  • CRAVE by CRV (US): Upcycled Jewelry and accessories made from old clothes and dilapidated kiddie pools!
  • Undone Clothing (US): Upcycled tape measure jewelry and accessories – my favorite from this shop is the upcycled film reel gift packaging!

Kids:

  • Beeper Bebe (US): The sweetest stuffies and plushies! Each handmade piece is made with upcycled materials or eco friendly new materials. A stuffed octopus made from t-shirts? Yes, even as an adult I want one!
  • Green Toys (US): A toy company made 100% from recycled milk jugs! No glue, metal, screws or paint! They feature toys like vehicles, jump ropes, stacking and tub toys, etc!

Other:

  • Lionshed Designs (UK): Upcycled VHS tape notebooks! What did they do with the VHS tapes you may ask? Turned them into planters!
  • Couch Guitar Straps (US): Deadstock and Reclaimed fabrics make up some seriously awesome guitar and camera straps. They are made of at least 25% recycled materials, including deadstock fabrics and seatbelts! Shop also sells belts, wallets and drum accessories.
  • The Ugly Company (US): upcycled “ugly” fruit into dried fruit snacks! Food Waste is a serious issue and The Ugly Company is helping to combat waste by turning it into their products! They offer nectarines, apricots, kiwis, and peaches!
  • Hudson Houndstooth (US): A company for pet accessories! Handmade pieces made with reclaimed and recycled materials including bow ties, bandanas, tug toys and waste bag holders!

Sports Equipment/ Profession Based:

  • Vintage Golf Gifts (US): Some really cool products made from repurposed golf clubs! They have bottle openers, lamps, clocks and even furniture!
  • Recycled Sports Equipment – Uncommon Goods (US): I’ve bought a few things from Uncommon Goods, especially since they like to focus on small business and fair trade options. Here’s a whole section of items made from recycled sporting equipment! (Prices vary but I love the upcycled hockey stick snow brush and BBQ set!)
  • SeshNotStigma (UK): Recycled skateboard jewelry and accessories including keychains, phone cases and clocks!

  • BoardThing (International): This shop specializes in rings made from recycled skateboards!
  • Recycled Firefighter (US): Making wallets, bags and belts out of decommissioned fire hoses!
  • Firefighter Turn Out Bag (US): Sells upcycled bags made from old firefighting gear. You can also send in your old gear for a custom bag! (As seen on Shark Tank)
  • Sword and Plough (US): Upcycled bags and accessories made out of repurposed military surplus and durable military grade materials. Purchases help empower veteran employment, reduce waste, and they donate 10% of profits to impactful veteran initiatives!

One more business to add to this list, mine!

I absolutely love creating bags and accessories with reclaimed fabrics and upcycled fabric swatches. There is so much textile waste in the world, I love helping bring new life to materials that would have otherwise been thrown away! You can shop my handmade pieces on etsy!

Gathering businesses for this list was really exciting. It was so fun to see how people are innovating their products and trying to make our planet greener and I really hope you can walk away from this list saying “no way, that’s so cool!” at least once!

If you know of another great upcycled/recycled business or want to share your own, leave a link down below! Be sure to tell us what you make and the best way to shop!

handmade wardrobe · refashion · sewing

Floral Tablecloth Lander Pants

I’ve had so many projects this year that haven’t worked out. There are a whole bunch of reasons why; using the wrong pattern or the wrong fabrics, rushing projects or starting and losing motivation to finish, the reasons seem endless.

I wanted a project that had a good chance of working out. I wanted something fun and inspiring and not too difficult to make. I also wanted to use this tablecloth I just picked up on Poshmark! In my quest for using sustainable fabric and secondhand sources, I’ve been looking on sites like Poshmark and Mercari for tablecloths and sheets. I saw this piece on Posh but didn’t make a plan for it until it arrived. A tablecloth can have a pretty broad range of feel, and even if it says 100% cotton, there’s a chance of it being thicker, thinner, etc. This tablecloth was a great, medium weight, almost canvas like but a little lighter.

I decided to make a pair of pants and landed on the Lander Pants! I’ve made Lander Shorts before and they come together pretty easily, and I really like the fit so I knew these were just about fool-proof.

I am a skinny jean lover. I used to wear boot cut jeans growing up, but once the skinny jean trend started, I never stopped wearing them! But I like getting out of my comfort zone a little bit – like I did with this jumpsuit – and thought making a pair of lander pants would be fun!

My last pair of Lander Shorts were made in a size 2, so I made the pants in the size 2 as well. The size 2 fits really well in my hips, but has the slightest gap in the back waist. This happens with all of my pants and jeans, and honestly I just haven’t taken the time to figure out how to solve that problem. It isn’t a big deal, and I almost always wear a belt with whatever bottoms I’m wearing, but I wanted to mention it anyway.

I also really love the button fly on these pants. I used to dislike installing jean buttons on anything – jeans, jackets, etc. I was using the Dritz jean buttons because they were convenient to purchase but they were really difficult for me to install. Every time I hammered, the tops would bend, or the screw would bend making my buttons lopsided. Since I started buying a lot more supplies online this year, like my needles, I also started branching out for other supply options. I came across jean buttons from Wawak Sewing and couldn’t believe how great they came out! Just wanted to share that option for anyone else facing a similar issue!

I followed the instructions for the hem, but wound up cutting off 3″ from the bottom before folding up the final hem. For my petite friends – I’m 4’10” and cut the pattern for the ankle fit. I love these pants with flats, and I also really like them with ankle boots and heels, although I won’t wear these with them as often! These pants are bright and bold but they pair well with so many of the basics in my wardrobe – they fit right into my closet!

refashion · sewing

Shirt Dress to Peplum Top Refashion

Happy Sunday! I’ve been busy with sewing projects and finally took a little time for a new refashion! Usually I post refashions on Friday’s but this one is done and I didn’t want to wait until next Friday to share!

I bought this shirt dress secondhand on ThredUp awhile back. I fell in love with the color and was happy to see the size was in petite, so it should really fit. When it arrived, I still loved the color but I wasn’t thrilled with how it looked on me – it felt a little boring. I kept it in my closet for a bit, hoping I would be inspired to wear it, but it just sat there. I really wanted to wear this piece and didn’t want it sitting in my closet any longer so I decided to refashion it! I knew making it into a top would guarantee me wearing it often, and I turned to a previous refashion for a little inspiration.

Back in February, I did a very similar refashion of turning a dress into a peplum top, and I loved how easy the process was, I wanted to do something similar for this top. I had this dress from Zara pinned as inspiration for a long time now, because I really loved how the peplum was connected to the bodice, giving it more of a layered look than just straight sewn on and wanted to recreate that detail with this top. It wasn’t a hard process, and I have the steps down below!

  • If you have a dress with an uneven hem, you will have to even it out.
  • Mark where you want your waistline to be. For me, it was right where the button placket ends. From this point, measure down 1″. Measure this point to the end of your even hem. Mine measured 14.5″. Use this measurement to continue to mark the top of the dress where your waistline will be cut.
  • Seam rip one side seam up to your new waistline and cut the bottom half off your dress. If you have an uneven dress hem, you can also cut off the hem.
  • On the bottom half of your dress, measure the halfway point, mark and cut. With right sides together, stitch one side together creating one long strip of material. Gather this strip to the length of your dress top. Once your strip is gathered, stitch strip ends right sides together and set aside.
  • On the top of your dress, fold the bottom up 1″ around the entire hemline. This fold will be very helpful later on.
  • With right sides together, stitch your gathered bottom to your top hem. I like to divide the gathered piece in 4ths, to properly align the sides and centers.
  • Fold the waist on the foldline from before, tucking the gathering under. I pinned on the front for show, and then switched my pins to the wrong side to sew. Stitch this with about a 1/4″ seam allowance, just enough to catch the waistline and gathering.
  • Complete the waist by topstitching just the folded edge, making sure not to stitch the bottom peplum.
  • Lastly, hem your peplum! I did a 1/2″ hem since my dress wasn’t long to begin with.

I love how this top came out and it is going to get so much wear in my wardrobe! The last step I wanted to do was to add buttons to the top pockets but I don’t have any matching ones at the moment. The pockets don’t need them, but I think they would be a cute touch. I photographed this top with the sleeves cuffed but it looks cute with the sleeves long as well!

I also created a video tutorial! Check it out below! (Music is Voyage by Ikson Music)